Planning a baby shower and need some tasty bites to impress your guests? Check out this list of 25 delightful appetizer finger foods that are perfect for snacking and mingling. From savory to sweet, these finger foods are simple to prepare and will ensure everyone leaves with a smile. Let’s dig in!
Affiliate Disclosure: "As an Amazon Associate I earn from qualifying purchases made from the images and links in this post. We are a participant in the Amazon Services LLC Associates Program, an affiliate advertising program designed to provide a means for us to earn fees by linking to Amazon.com and other affiliated sites."
Mini Shrimp Cocktail Cups
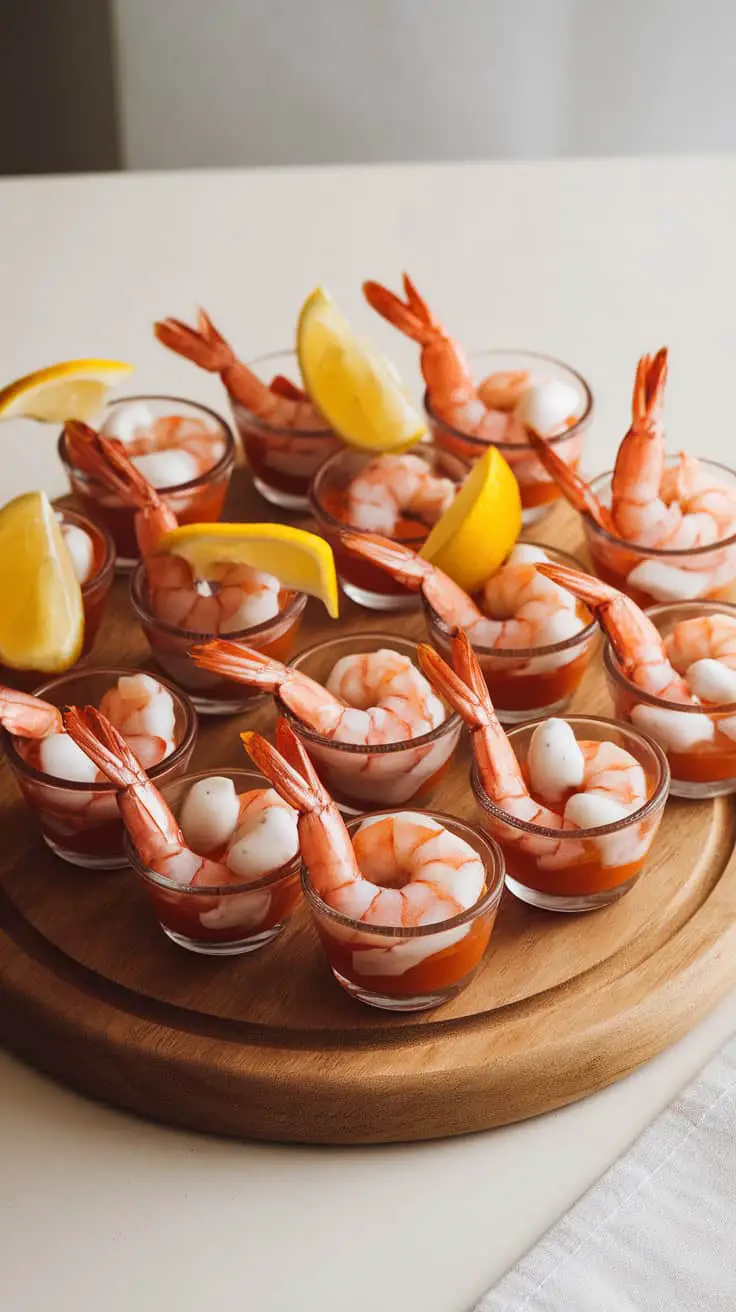
These mini shrimp cocktail cups are a fun and easy way to serve a classic dish. Each little glass is packed with freshness, featuring juicy shrimp, zesty cocktail sauce, and a hint of lemon.
The vibrant colors and appealing presentation make them perfect for gatherings. Everyone loves shrimp cocktail, and serving it in individual cups makes it so convenient for guests to grab and enjoy.
To make these delightful treats, you’ll need shrimp, cocktail sauce, and lemon wedges. Just cook the shrimp, layer them with sauce, and top with a squeeze of lemon for a burst of flavor.
They’re not just tasty; they also add a stylish touch to any table. Perfect for parties, picnics, or even a cozy night in, these cups will surely impress!
Ingredients Breakdown
Let’s dive into what makes these Mini Shrimp Cocktail Cups irresistible. They’re fresh, zesty, and under 250 calories per serving—a perfect appetizer for any occasion.
For the Shrimp:
- 1 lb large shrimp, peeled and deveined (for a juicy, tender bite)
- 1 tbsp olive oil (keeps them succulent)
- 1 tsp Old Bay seasoning (for a classic seafood flavor)
- Salt and pepper to taste
For the Cocktail Sauce:
- 1/2 cup ketchup (the base of that tangy goodness)
- 2 tbsp prepared horseradish (for a spicy kick)
- 1 tbsp fresh lemon juice (for brightness)
- 1 tsp Worcestershire sauce (depth of flavor)
- 1 tsp hot sauce (optional, for extra heat)
For the Cups and Garnish:
- Small clear cups (for easy serving)
- Lemon wedges (for a fresh burst)
- Fresh parsley, finely chopped (adds color and aroma)
- Celery sticks, thinly sliced (optional, for crunch)
How to Make It:
- Cook the Shrimp: Toss shrimp with olive oil, Old Bay seasoning, salt, and pepper. Heat a skillet over medium-high heat and cook shrimp for 2-3 minutes on each side until pink and opaque. Let them cool.
- Make the Cocktail Sauce: In a bowl, whisk together ketchup, horseradish, lemon juice, Worcestershire sauce, and hot sauce until smooth.
- Assemble the Cups:
- Spoon a layer of cocktail sauce into each cup.
- Arrange 2-3 shrimp on top of the sauce.
- Add a lemon wedge and sprinkle with parsley.
- Optionally, tuck in a celery stick for extra crunch.
- Serve and Enjoy: Arrange the cups on a wooden platter for a stylish presentation. Keep chilled until ready to serve.
Why They’re a Hit:
- Fresh and Juicy: The perfectly seasoned shrimp are tender and flavorful.
- Zesty and Tangy: The cocktail sauce balances sweetness, heat, and citrus notes.
- Stylish and Convenient: Pre-portioned cups are easy to serve and look stunning on any table.
Whether you’re hosting a party or craving a light, elegant snack, these Mini Shrimp Cocktail Cups are the way to go!
Mini Caprese Skewers
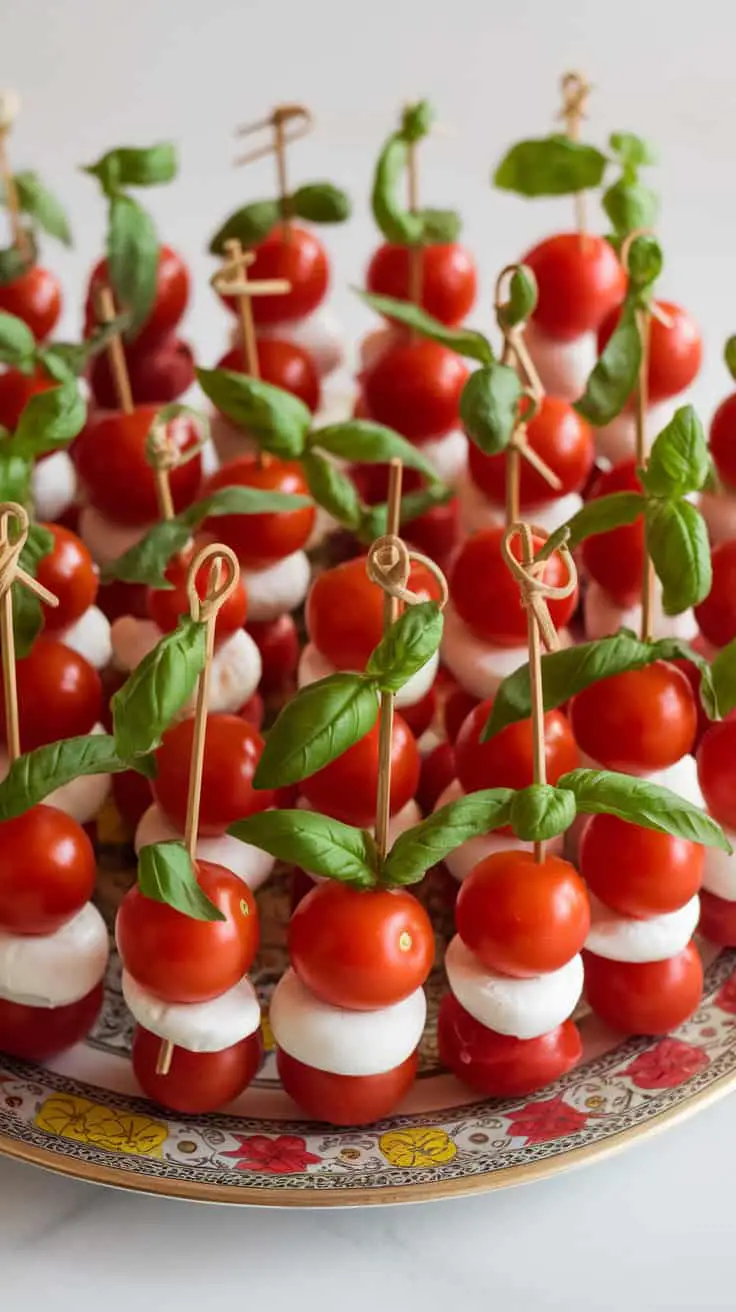
Mini Caprese skewers are a delightful bite-sized treat that combines fresh ingredients. This image shows a beautiful display of skewers with vibrant red cherry tomatoes, creamy mozzarella balls, and bright green basil leaves. The colors really pop, making them visually appealing for any gathering.
Making these skewers is super simple. Start with fresh cherry tomatoes and mini mozzarella balls. Stack them on a small skewer with a basil leaf in between each layer. It’s a fun way to enjoy the classic flavors of a Caprese salad in a portable form.
These skewers are perfect for parties or as a light snack. They are refreshing and packed with flavor, making them a hit with everyone. Plus, they are easy to make in bulk, so you won’t have to worry about running out quickly!
Ingredients Breakdown
Let’s dive into what makes these Mini Caprese Skewers so fresh, flavorful, and under 250 calories per serving.
For the Skewers:
- Cherry Tomatoes: 1 pint (sweet, juicy, and bursting with flavor)
- Mini Mozzarella Balls: 8 oz (creamy and mild, perfect for balance)
- Fresh Basil Leaves: 1 bunch (fragrant and peppery)
- Balsamic Glaze: 2 tbsp (adds a tangy-sweet finish)
- Extra Virgin Olive Oil: 1 tbsp (for added richness)
- Salt & Pepper: To taste (brings all the flavors together)
- Mini Skewers: About 20 (wooden or reusable)
How to Make It:
- Prepare the Ingredients: Rinse the cherry tomatoes and basil leaves. Pat them dry to keep the skewers fresh longer.
- Assemble the Skewers:
- Start by threading a cherry tomato onto each skewer.
- Follow with a fresh basil leaf, folding it if needed.
- Add a mini mozzarella ball next.
- Repeat the layering process until the skewer is filled.
- Season and Drizzle: Lay the completed skewers on a serving platter. Drizzle with olive oil and balsamic glaze. Sprinkle lightly with salt and pepper.
- Serve and Enjoy: Serve immediately for the freshest taste or refrigerate for up to 2 hours before serving.
Why They’re Amazing:
- Visually Stunning: The red, white, and green combination makes these skewers a showstopper.
- Simple yet Elegant: Easy to assemble but looks fancy enough for any gathering.
- Fresh and Healthy: Packed with wholesome ingredients that satisfy without weighing you down.
These Mini Caprese Skewers are the perfect blend of fresh, creamy, and tangy—all on a single skewer. They’re great for parties, picnics, or anytime snacking!
Deviled Egg Trio (Classic, Spicy, and Avocado)
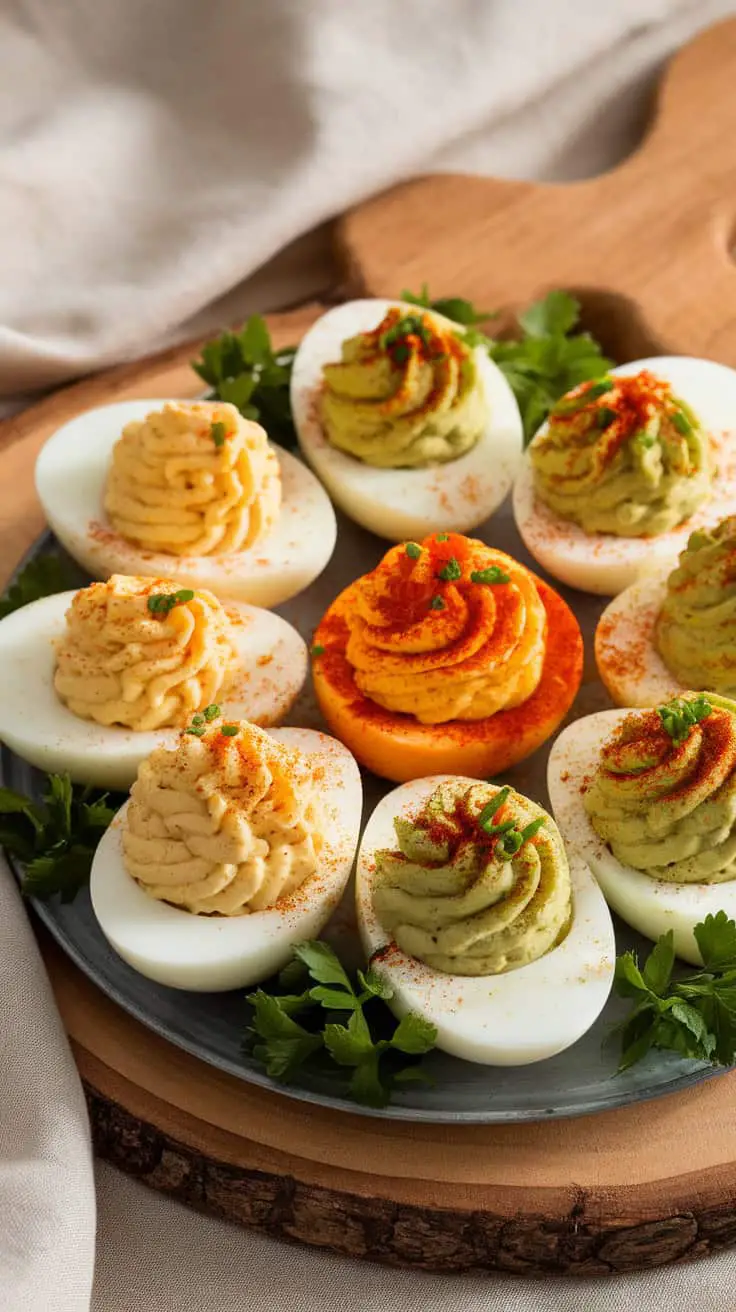
This delightful image showcases a beautiful platter of deviled eggs, each with its own unique twist. You’ll find three distinct flavors: classic, spicy, and avocado. The eggs are perfectly halved, with creamy fillings piped on top, making them look both inviting and delicious.
The classic version features a smooth and tangy filling, topped with a sprinkle of paprika for that traditional touch. Next to it, the spicy option brings a kick, likely enhanced with hot sauce or mustard, adding vibrant color and flavor. Finally, the avocado deviled eggs offer a creamy, fresh taste, bringing a modern twist to this timeless dish.
Served on a rustic plate and garnished with fresh herbs, these deviled eggs are perfect for any gathering, from casual get-togethers to festive celebrations. They not only taste great but also add a pop of color to your table!
Ingredients Breakdown
Here’s how to create a stunning platter of deviled eggs with classic, spicy, and avocado fillings—all under 250 calories per serving.
For the Base:
- 12 large eggs (hard-boiled and halved)
- 1 tsp salt (for cooking water)
Classic Deviled Eggs:
- 4 egg yolks (from the boiled eggs)
- 2 tbsp light mayonnaise (creamy texture without extra calories)
- 1 tsp Dijon mustard (adds a tangy kick)
- 1 tsp white vinegar (for a slight zing)
- Salt and pepper to taste
- Paprika (for garnish)
Spicy Deviled Eggs:
- 4 egg yolks (from the boiled eggs)
- 2 tbsp Greek yogurt (lighter alternative to mayo)
- 1 tsp hot sauce (adjust for heat preference)
- 1 tsp Dijon mustard (adds depth)
- 1/2 tsp smoked paprika (for smoky heat)
- Pinch of cayenne pepper (optional for extra spice)
- Salt and pepper to taste
- Sliced jalapeños or chili flakes (for garnish)
Avocado Deviled Eggs:
- 4 egg yolks (from the boiled eggs)
- 1 small ripe avocado (smooth and creamy)
- 1 tbsp lime juice (prevents browning and adds freshness)
- 1 tbsp Greek yogurt (for extra creaminess)
- Salt and pepper to taste
- Fresh cilantro or chives (for garnish)
How to Make It:
- Cook the Eggs: Place the eggs in a pot with salted water. Bring to a boil, then cover and remove from heat. Let sit for 12 minutes. Cool in an ice bath and peel.
- Prepare the Fillings:
- Scoop out the yolks and divide them evenly into three bowls.
- Mix the ingredients for each filling separately until smooth and creamy.
- Fill the Egg Halves: Use a piping bag or spoon to fill each egg white half with the corresponding filling. Be generous for a satisfying bite!
- Garnish: Sprinkle with paprika, herbs, or sliced jalapeños as needed.
Why You’ll Love It:
- Flavor Variety: Three distinct tastes—classic, spicy, and avocado.
- Health-Conscious: Lightened-up ingredients keep this dish nutritious.
- Perfect for Gatherings: Visually stunning and easy to share.
These deviled eggs aren’t just a snack—they’re a trio of delicious, bite-sized creations that are sure to impress your guests!
Baby Veggie Cups with Hummus
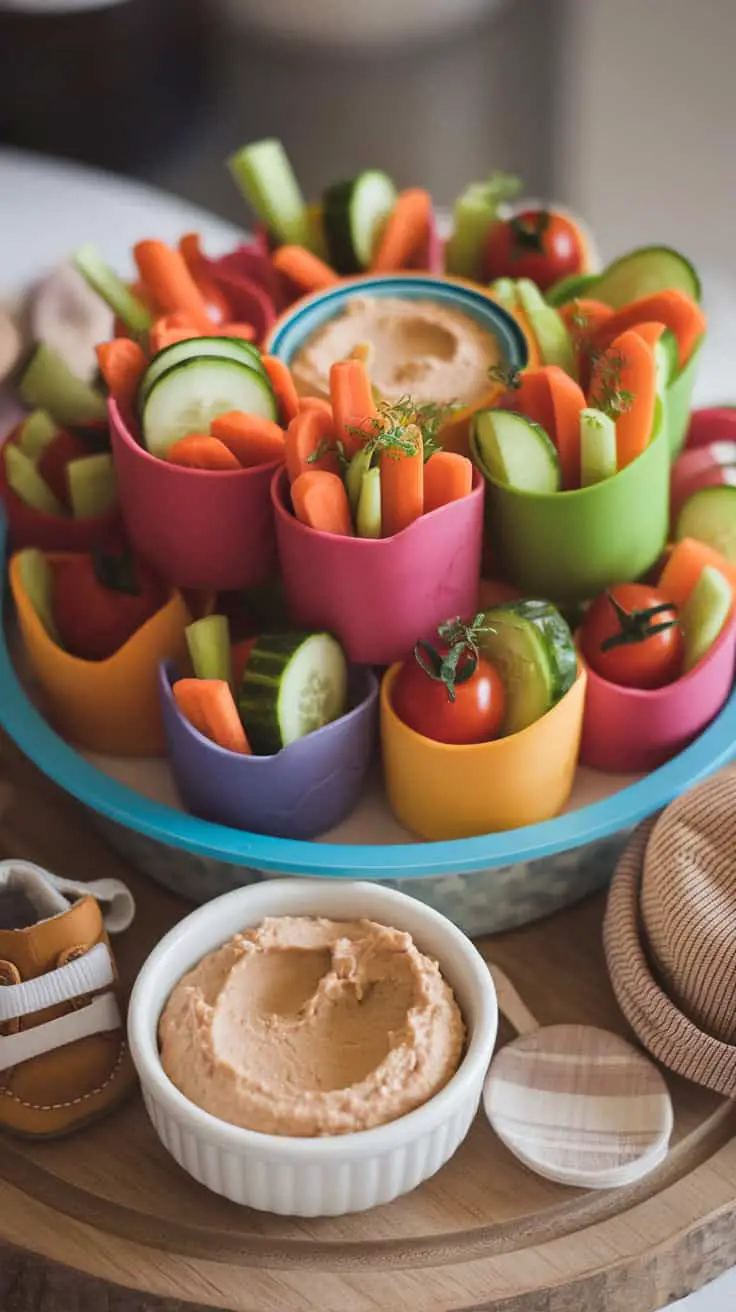
These baby veggie cups are a colorful and fun way to serve fresh vegetables. Each cup is packed with crunchy carrots, cucumbers, and vibrant cherry tomatoes, making healthy snacking exciting for little ones.
The hummus in the center is creamy and smooth, perfect for dipping. Using a variety of colors in the cups not only makes the dish eye-catching but also encourages kids to try different veggies.
This idea is great for parties or even a simple snack at home. It’s easy to prepare and can be customized with whatever veggies you have on hand. Plus, it’s a fantastic way to introduce healthy eating to kids!
Ingredients Breakdown
Let’s dive into what makes these baby veggie cups a snack-time winner. They’re healthy, colorful, and under 250 calories per serving—ideal for guilt-free munching.
For the Veggie Cups:
- Carrots: 2 large carrots, peeled and cut into sticks (crunchy and sweet)
- Cucumbers: 1 large cucumber, sliced into sticks (refreshing and hydrating)
- Cherry Tomatoes: 1 cup, halved (bursting with juicy flavor)
- Bell Peppers: 1 red and 1 yellow bell pepper, sliced into strips (for a pop of color and crunch)
- Celery Sticks: 2 stalks, cut into sticks (classic for dipping)
For the Hummus:
- Chickpeas: 1 can (15 oz), rinsed and drained (protein-packed base)
- Tahini: 1/4 cup (adds a nutty depth)
- Lemon Juice: 2 tbsp (brightens the flavor)
- Garlic: 1 clove, minced (adds savory richness)
- Olive Oil: 2 tbsp (for smooth blending)
- Ground Cumin: 1/2 tsp (a warm, earthy note)
- Salt and Pepper: To taste (balances the flavors)
- Water: As needed for desired consistency
How to Make It:
- Prep the Veggies: Wash and cut all veggies into sticks or bite-sized pieces. Arrange them in individual cups for easy serving.
- Make the Hummus: In a food processor, combine chickpeas, tahini, lemon juice, garlic, olive oil, cumin, salt, and pepper. Blend until smooth, adding water as needed for a creamy texture.
- Assemble the Cups: Fill each cup with a variety of veggie sticks. Place a small bowl of hummus in the center or spoon some into each cup.
- Serve and Enjoy: Garnish with a sprinkle of paprika or fresh parsley for extra flair.
Why It’s Amazing:
- Healthy and Fun: Vibrant veggies make snacking visually appealing.
- Protein-Rich Dip: Hummus adds a satisfying, creamy element.
- Easy to Customize: Swap in your favorite veggies or try different hummus flavors.
These baby veggie cups with hummus are a fun, nutritious way to snack. They’re perfect for parties, lunchboxes, or even a quick afternoon treat!
Mini Chicken and Waffle Bites

Mini Chicken and Waffle Bites are a fun twist on a classic combination. In the image, you can see tiny, fluffy waffles topped with crispy, golden chicken pieces. They are drizzled with a rich, sweet sauce that adds a delightful finish.
These bites make for great appetizers or party snacks. They’re easy to grab and eat, making them perfect for gatherings. The vibrant colors in the setting, with pink and blue decorations, add a festive touch, hinting at celebrations or special occasions.
To make these tasty treats at home, you will need chicken, waffle mix, and your favorite syrup or sauce. Start by cooking the chicken until it’s crispy, then whip up the waffles. Stack them together and drizzle with sauce for a delicious bite-sized treat. Enjoy!
Ingredients Breakdown
Let’s dive into what makes these Mini Chicken and Waffle Bites so irresistible. Each component is simple yet packed with flavor, making them the ultimate party snack under 250 calories per serving.
For the Waffles:
- 1 cup whole wheat waffle mix (for a hearty base)
- 3/4 cup unsweetened almond milk (light and dairy-free)
- 1 large egg (adds structure and fluffiness)
- 1 tbsp unsweetened applesauce (natural sweetness)
- 1 tsp vanilla extract (boosts flavor)
For the Chicken:
- 1 lb boneless, skinless chicken breast (lean protein)
- 1/2 cup whole wheat breadcrumbs (for a crispy coating)
- 1/4 cup panko breadcrumbs (adds extra crunch)
- 1 tsp smoked paprika (for smoky depth)
- 1 tsp garlic powder (savory goodness)
- 1/2 tsp salt (flavor enhancer)
- 1/2 tsp black pepper (a touch of heat)
- 1 large egg (for coating the chicken)
- 2 tbsp olive oil (for baking or frying)
For the Sauce:
- 1/4 cup pure maple syrup (for sweetness)
- 2 tbsp Dijon mustard (adds tang)
- 1 tbsp hot sauce (optional, for heat)
How to Make It:
- Prepare the Waffles: In a bowl, mix waffle ingredients until smooth. Preheat a mini waffle maker and cook the waffles until golden brown. Set aside.
- Cook the Chicken: Preheat oven to 400°F (200°C). Cut chicken into bite-sized pieces. In one bowl, beat the egg. In another bowl, mix breadcrumbs, paprika, garlic powder, salt, and pepper. Dip chicken pieces into the egg, then coat in breadcrumbs. Place on a baking sheet and drizzle lightly with olive oil. Bake for 20-25 minutes, flipping halfway through, until crispy and cooked through.
- Make the Sauce: In a small bowl, whisk together maple syrup, Dijon mustard, and hot sauce for a sweet-and-tangy drizzle.
- Assemble the Bites: Stack a piece of chicken on each mini waffle. Secure with a toothpick if needed. Drizzle with the sauce just before serving.
Why They’re Amazing:
- Sweet and Savory Combo: The maple syrup sauce balances the crispy chicken and fluffy waffles.
- Bite-Sized Fun: Easy to grab, making them perfect for parties.
- Healthier Twist: Baked chicken and whole wheat waffles keep the bites light but satisfying.
These Mini Chicken and Waffle Bites are a guaranteed crowd-pleaser that will keep everyone coming back for more. Enjoy every flavorful, crispy, and sweet bite!
Bite-Sized Spinach and Feta Puffs
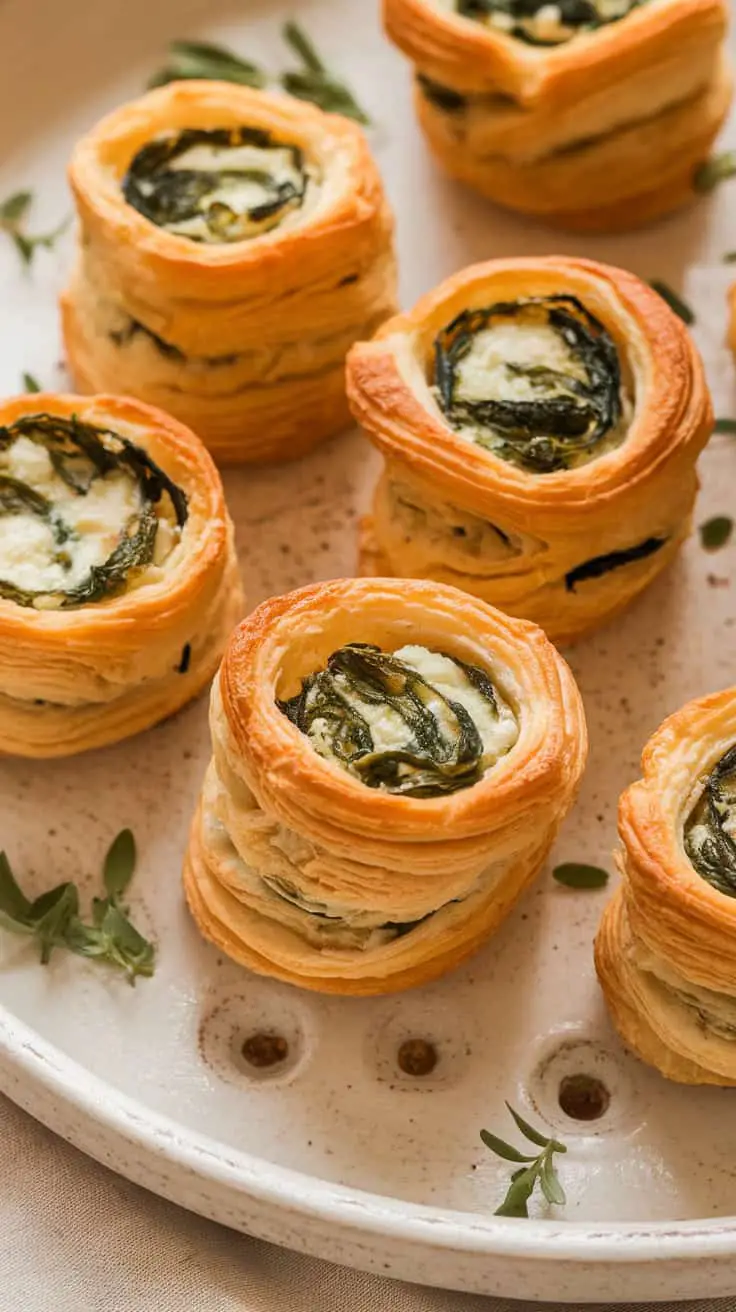
These bite-sized spinach and feta puffs are a fun and tasty treat. They look golden brown and flaky, perfect for any gathering. Each puff is filled with a delicious mixture of spinach and creamy feta cheese.
The presentation is appealing, with the spiraled design drawing you in. They sit neatly on a simple plate, making them easy to grab and enjoy. Fresh herbs around the puffs add a touch of color and freshness.
This dish is not just pretty; it’s also easy to make. Using store-bought puff pastry saves time and effort. Simply roll out the dough, fill it with the spinach and feta mixture, and bake until crispy. You can serve them warm or at room temperature, making them versatile for any occasion.
Ingredients Breakdown
These bite-sized spinach and feta puffs are deliciously flaky and surprisingly simple to make. They’re a perfect appetizer or snack that’s under 250 calories per serving.
For the Filling:
- 2 cups fresh spinach, chopped (for a nutritious, vibrant base)
- 1/2 cup crumbled feta cheese (salty and creamy)
- 1/4 cup ricotta cheese (adds a smooth, mild texture)
- 1 egg, beaten (helps bind the filling)
- 1 clove garlic, minced (for added depth of flavor)
- 1 tsp dried oregano (brings a Mediterranean touch)
- 1/2 tsp ground nutmeg (optional, but enhances the spinach flavor)
- Salt and pepper to taste
For the Pastry:
- 1 sheet frozen puff pastry, thawed (store-bought saves time)
- 1 egg, beaten (for brushing to get that golden finish)
For Garnish:
- Fresh parsley or dill, chopped (optional but adds a fresh pop of color)
How to Make It:
- Prepare the Filling: Sauté spinach in a dry pan until wilted. Cool slightly, then squeeze out excess moisture. Mix with feta, ricotta, garlic, oregano, nutmeg, salt, and pepper. Stir in the beaten egg until well combined.
- Roll and Fill: On a floured surface, roll out the puff pastry into a rectangle. Cut into 2-inch squares. Place a small spoonful of filling in the center of each square.
- Shape the Puffs: Fold opposite corners of each square toward the center and pinch to seal. Alternatively, roll them into spirals for a fun look.
- Brush and Bake: Place puffs on a parchment-lined baking sheet. Brush with beaten egg for shine. Bake at 400°F (200°C) for 15-20 minutes, or until golden brown and puffed.
- Serve and Enjoy: Arrange the puffs on a serving plate and sprinkle with fresh herbs for extra flavor and visual appeal.
Why They’re Amazing:
- Perfectly Flaky: The puff pastry turns crispy and golden.
- Savory and Satisfying: The spinach and feta combo is a classic.
- Easy Yet Elegant: They look fancy but are surprisingly simple to make.
These spinach and feta puffs are the ultimate crowd-pleaser—flaky, flavorful, and perfect for any occasion!
Smoked Salmon and Cream Cheese Pinwheels
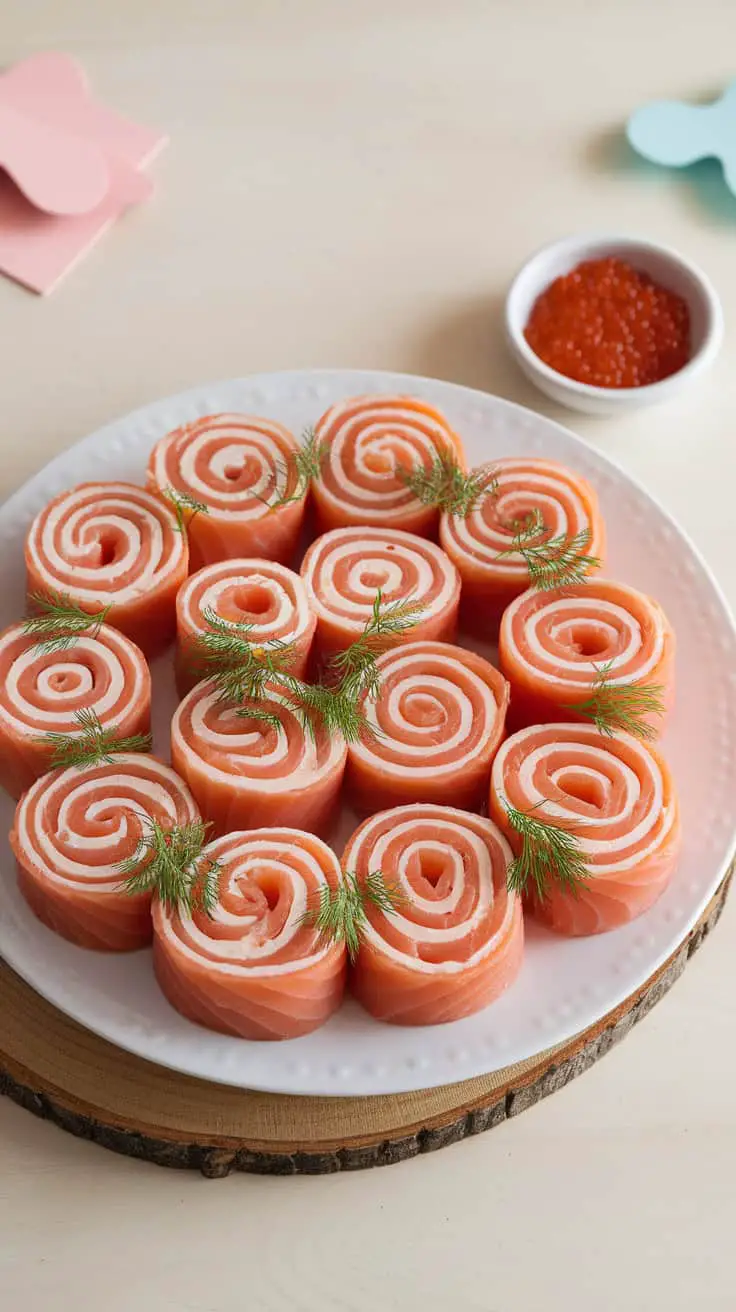
These smoked salmon and cream cheese pinwheels are a feast for the eyes and the taste buds. The spiral design showcases layers of rich salmon and creamy cheese, making them not just delightful to look at but also to eat. Each bite bursts with flavor, leaving you wanting more.
To create these tasty treats, you’ll need just a few simple ingredients: smoked salmon, cream cheese, fresh dill, and a bit of lemon juice for that extra zing. The preparation is as easy as spreading the cream cheese on the salmon, rolling it up tightly, and slicing it into pinwheels.
Perfect for gatherings or as a light snack, these pinwheels are sure to impress your guests. Arrange them on a platter, garnish with dill, and serve alongside a bowl of caviar for a touch of elegance. Enjoy the combination of textures and flavors!
Ingredients Breakdown
Let’s get into the delicious details of these smoked salmon and cream cheese pinwheels. They’re elegant yet simple, perfect for entertaining or treating yourself.
For the Pinwheels:
- 8 oz smoked salmon (thinly sliced for easy rolling)
- 8 oz cream cheese (softened for smooth spreading)
- 2 tbsp fresh dill (finely chopped for a burst of herby flavor)
- 1 tbsp lemon juice (for brightness and zing)
- 4 large tortillas or flatbreads (for structure and wrapping)
For Garnishing:
- Fresh dill sprigs (for an extra touch of elegance)
- Caviar (optional, for added luxury)
- Lemon wedges (for squeezing just before serving)
How to Make It:
- Prepare the Spread: In a bowl, mix softened cream cheese, chopped dill, and lemon juice until smooth and well combined.
- Layer the Ingredients: Lay out the tortillas or flatbreads on a clean surface. Spread an even layer of the cream cheese mixture over each one.
- Add the Salmon: Place slices of smoked salmon on top of the cream cheese layer, covering the surface but leaving a small border along the edges.
- Roll It Up: Starting from one edge, tightly roll each tortilla into a log shape. Use gentle but firm pressure to keep everything secure.
- Chill and Slice: Wrap each roll in plastic wrap and refrigerate for at least 1 hour to set. Once chilled, slice into 1-inch pinwheels.
- Serve and Enjoy: Arrange the pinwheels on a serving platter. Garnish with fresh dill sprigs, lemon wedges, and caviar if desired.
Why They’re Amazing:
- Savory and Fresh: The smoky richness of the salmon pairs beautifully with the creamy, herby cheese.
- Elegant Presentation: The spiral design looks stunning on any appetizer table.
- Simple Yet Impressive: Easy to make but sophisticated enough for special occasions.
These pinwheels are a delightful combination of flavor and presentation, making them a perfect appetizer for any gathering!
Stuffed Baby Bell Peppers

Stuffed baby bell peppers make for a colorful and inviting dish, perfect for any meal. These little gems are bursting with flavor and nutrition. The vibrant colors of red, yellow, and green peppers not only look appealing but also add a fresh crunch to your plate.
In this recipe, each pepper is filled with a delicious mixture of quinoa, veggies, and cheese. The quinoa provides a great source of protein, while the fresh vegetables add vitamins and minerals. You can customize the filling based on your preferences, making it a versatile option for everyone.
To prepare, simply slice the tops off the peppers and remove the seeds. Cook the quinoa according to the package instructions, then mix it with your choice of ingredients. Stuff each pepper generously with the filling, top with some cheese, and bake until the peppers are tender and the cheese is bubbly.
These stuffed peppers are not only tasty but also a great way to sneak in some extra vegetables into your diet. They can be served as a main dish or a delightful side. Enjoy them warm or at room temperature for a picnic or potluck!
Ingredients Breakdown
Let’s dive into what makes these stuffed baby bell peppers so delicious. They’re flavorful, satisfying, and under 250 calories per serving—perfect for a healthy, tasty meal.
For the Peppers:
- 12 baby bell peppers (red, yellow, and green for color variety)
For the Quinoa Filling:
- 1 cup cooked quinoa (light and protein-packed)
- 1/2 cup black beans, rinsed and drained (for extra protein and fiber)
- 1/2 cup corn kernels (sweet and juicy)
- 1/2 cup diced tomatoes (fresh or canned)
- 1/4 cup chopped red onion (adds a bit of zing)
- 1/2 tsp cumin (for warmth and depth)
- 1/2 tsp smoked paprika (for a smoky kick)
- 1/2 tsp garlic powder (for savory goodness)
- Salt and pepper to taste (balance the flavors)
For Topping:
- 1/2 cup shredded mozzarella or cheddar cheese (melty and delicious)
- Fresh cilantro (optional, for garnish)
How to Make It:
- Prep the Peppers: Slice the tops off the baby bell peppers and remove the seeds and membranes inside. Set them aside on a baking tray.
- Make the Filling: In a large bowl, combine cooked quinoa, black beans, corn, tomatoes, red onion, and spices. Stir well until evenly mixed.
- Stuff the Peppers: Spoon the filling generously into each pepper, pressing down lightly to ensure they’re fully packed.
- Add the Cheese: Sprinkle shredded cheese over the top of each stuffed pepper.
- Bake: Place the peppers in a preheated oven at 375°F (190°C) and bake for 20-25 minutes, or until the peppers are tender and the cheese is bubbly and golden.
- Serve and Enjoy: Garnish with fresh cilantro if desired. Serve warm as a main dish or a flavorful side.
Why You’ll Love It:
- Nutrient-Packed: Loaded with protein, fiber, and vitamins from quinoa, beans, and veggies.
- Customizable: Swap out ingredients based on what you love or have on hand.
- Family-Friendly: These peppers are fun to eat and look great on any dinner table.
These stuffed baby bell peppers are a celebration of flavor, nutrition, and simplicity—all wrapped up in a colorful, tasty package!
Baby BLT Sliders

These Baby BLT Sliders are a fun twist on a classic favorite. Perfect for parties or a casual snack, they combine crispy bacon, fresh lettuce, and juicy tomatoes, all nestled in soft slider buns.
The vibrant colors of the fresh ingredients really pop, making the sliders look as appealing as they taste. Each bite offers a delightful mix of textures and flavors, satisfying the craving for something savory and satisfying.
To make these sliders, you’ll need some simple ingredients: slider buns, bacon, lettuce, tomatoes, and mayonnaise. Start by cooking the bacon until it’s crispy. Then, slice the tomatoes and wash the lettuce. Assemble your sliders by spreading mayonnaise on the buns, layering on the bacon, lettuce, and tomato. It’s quick, easy, and oh-so-delicious!
Ingredients Breakdown
These Baby BLT Sliders are quick, satisfying, and under 250 calories per serving. Here’s what you’ll need to make these bite-sized favorites:
For the Sliders:
- 8 whole-grain slider buns (light yet sturdy)
- 8 slices center-cut bacon (crispy and flavorful)
- 2 large tomatoes (juicy and ripe, sliced thin)
- 4 leaves romaine lettuce (fresh and crisp, torn into slider-size pieces)
- 1/4 cup light mayonnaise (creamy but lighter on calories)
- 1 tbsp Dijon mustard (optional, for extra tang)
- Salt and pepper (to taste)
How to Make It:
- Cook the Bacon: Fry the bacon in a skillet over medium heat until crispy. Drain on paper towels and set aside.
- Prep the Veggies: Wash and dry the lettuce leaves, then slice the tomatoes thinly. Sprinkle a pinch of salt and pepper on the tomatoes to bring out their natural sweetness.
- Toast the Buns: Lightly toast the slider buns in the oven or on a skillet for extra texture.
- Assemble the Sliders: Spread a thin layer of mayonnaise on each side of the buns. Add a small dollop of Dijon mustard if desired.
- Bottom Bun: Start with a lettuce leaf for freshness.
- Bacon: Add a slice of crispy bacon for savory crunch.
- Tomato: Top with a juicy tomato slice for a burst of flavor.
- Top Bun: Close the slider and gently press down.
- Serve and Enjoy: Arrange the sliders on a wooden board or platter. Secure with toothpicks if serving at a party.
Why You’ll Love Them:
- Balanced and Satisfying: A perfect mix of crunchy, juicy, and creamy textures.
- Quick and Easy: Great for a snack, party appetizer, or light lunch.
- Health-Conscious: Using whole-grain buns, lean bacon, and light mayo keeps the calories in check.
These sliders are a guaranteed crowd-pleaser—simple, delicious, and fun to eat. Enjoy every bite of these little flavor-packed treats!
Mini Meatball Skewers with Marinara Dip
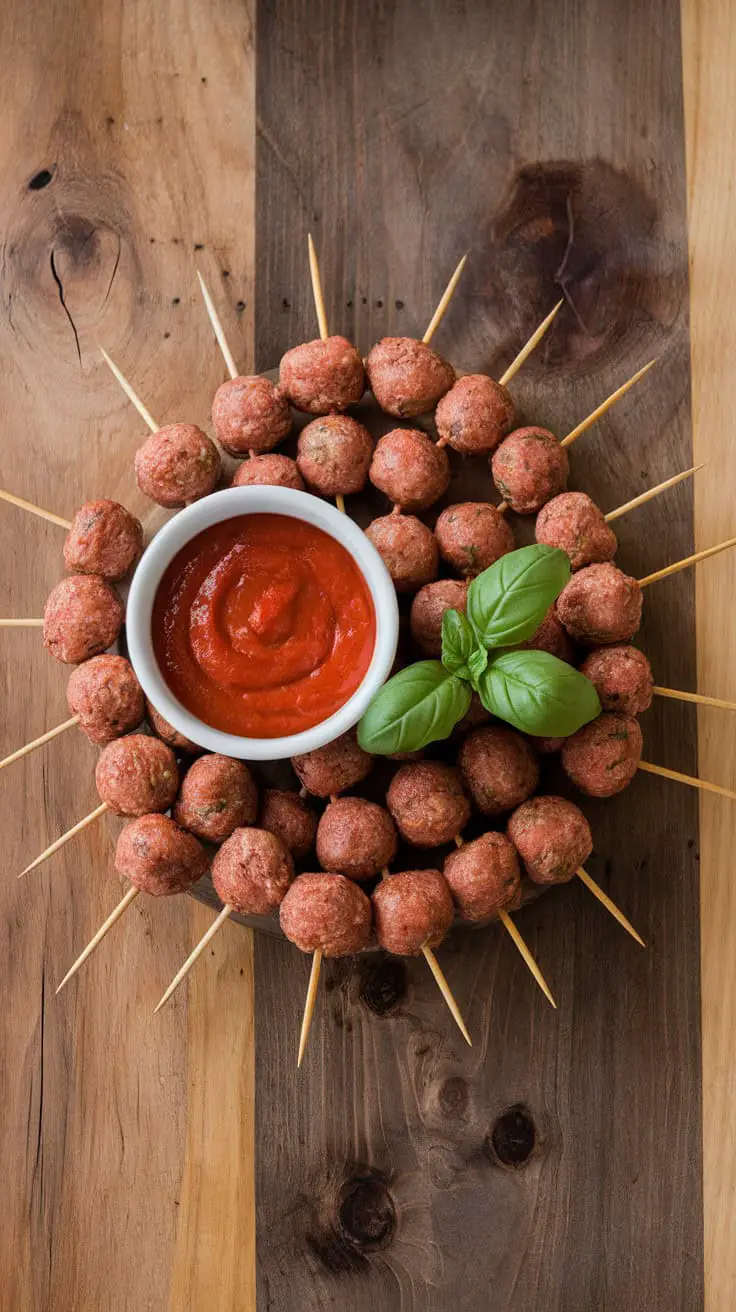
Check out these mini meatball skewers, perfect for any gathering. They’re arranged in a fun sunburst pattern, making them eye-catching and inviting. Each meatball is neatly speared with a toothpick, making them easy to grab and enjoy.
In the center, there’s a bowl of rich marinara sauce, just waiting for you to dip those tasty meatballs. The fresh basil leaves add a pop of color and a hint of freshness. It’s a simple setup, but it packs a punch in flavor.
These skewers are not just about looks. They’re made with classic ingredients: ground meat, breadcrumbs, herbs, and spices. The marinara dip brings everything together, adding that classic Italian touch. Perfect for parties, game days, or just a cozy night in!
Ingredients Breakdown
Let’s dive into what makes these mini meatball skewers so delicious. They’re flavorful, easy to make, and under 250 calories per serving—a perfect party bite.
For the Meatballs:
- 1 lb lean ground beef or turkey (your protein-packed base)
- 1/2 cup whole wheat breadcrumbs (adds structure and keeps them moist)
- 1/4 cup grated Parmesan cheese (for that savory, umami kick)
- 1 large egg (helps bind everything together)
- 2 garlic cloves, minced (adds depth of flavor)
- 1 tsp dried oregano (classic Italian herb)
- 1 tsp dried basil (for extra aroma)
- 1 tsp onion powder (subtle savory flavor)
- 1/2 tsp salt (enhances overall taste)
- 1/4 tsp black pepper (just the right amount of heat)
- 2 tbsp chopped fresh parsley (adds freshness and color)
For the Marinara Dip:
- 1 cup low-sodium marinara sauce (rich and tangy)
- 1/2 tsp garlic powder (boosts the savory flavor)
- 1/2 tsp red pepper flakes (optional, for a little heat)
- Fresh basil leaves for garnish (for a pop of color and freshness)
How to Make It:
- Make the Meatballs: Preheat your oven to 400°F (200°C). In a large mixing bowl, combine all meatball ingredients. Mix until just combined—don’t overwork the meat.
- Shape and Bake: Roll the mixture into small meatballs, about 1 inch in diameter. Place them on a baking sheet lined with parchment paper. Bake for 15-20 minutes, or until fully cooked and browned.
- Prepare the Marinara Dip: While the meatballs are baking, heat the marinara sauce in a small saucepan over low heat. Stir in garlic powder and red pepper flakes for extra flavor.
- Assemble the Skewers: Once the meatballs are cool enough to handle, skewer each one with a toothpick.
- Serve in Style: Arrange the skewers in a circular pattern around a bowl of the marinara dip. Garnish with fresh basil leaves.
Why They’re a Hit:
- Bite-Sized Convenience: Easy to grab and dip—perfect for parties.
- Classic Italian Flavors: From Parmesan and herbs to rich marinara.
- Balanced and Light: Lean protein and wholesome ingredients keep it satisfying but not heavy.
These mini meatball skewers aren’t just tasty—they’re a fun and flavorful way to bring people together over great food!
Cucumber Sandwich Bites
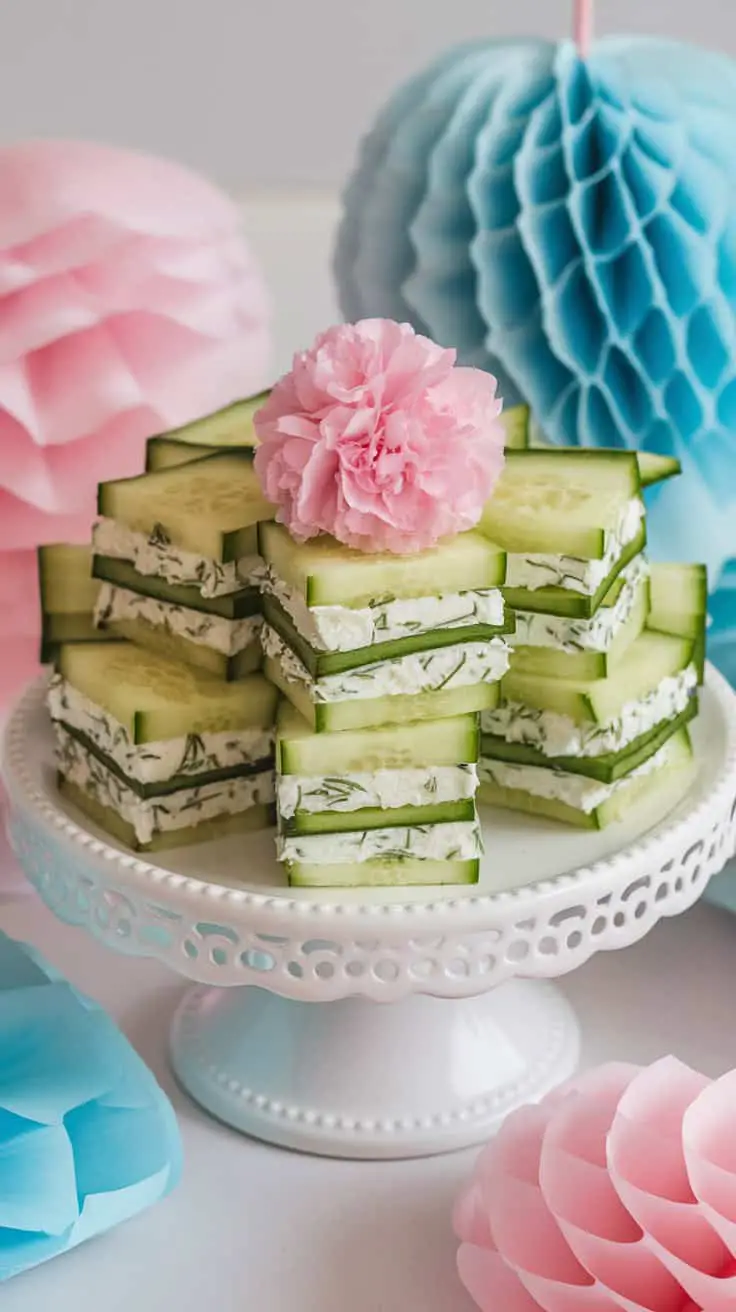
Cucumber sandwich bites are a refreshing treat that’s perfect for gatherings. These little delights are not only tasty but also visually appealing. The image showcases neat stacks of cucumber sandwiches, each layered with a creamy filling. The fresh green of the cucumber contrasts beautifully with the white filling, making them a standout on any table.
Making these sandwich bites is simple. You just need some fresh cucumbers, cream cheese, and herbs for flavor. Slice the cucumbers thinly and layer them with the cream mixture. Cut them into bite-sized squares for easy snacking. A little flower on top adds a lovely touch, making them perfect for parties or afternoon tea.
These bites are light, healthy, and full of flavor. They’re a great option for anyone looking to serve something unique and enjoyable. Don’t forget to prepare plenty—they’ll disappear quickly!
Ingredients Breakdown
Let’s make these delicious cucumber sandwich bites that are light, refreshing, and under 250 calories per serving. They’re perfect for a classy party spread or a casual snack.
For the Sandwich Bites:
- 1 large cucumber (thinly sliced for crisp freshness)
- 8 slices whole-grain or rye bread (for a hearty base)
- 4 oz reduced-fat cream cheese (smooth and creamy)
- 2 tbsp plain Greek yogurt (adds tang and lightness)
- 1 tsp lemon juice (for brightness)
- 1 tsp fresh dill, finely chopped (for herby freshness)
- 1 tsp fresh chives, finely chopped (mild onion flavor)
- Salt and pepper to taste (balances the flavors)
For Decoration:
- Edible flowers or small herbs (optional but elegant)
- Toothpicks or decorative skewers (for easy serving)
How to Make It:
- Prepare the Creamy Filling: In a small bowl, mix cream cheese, Greek yogurt, lemon juice, dill, chives, salt, and pepper until smooth and well combined.
- Slice and Prep: Thinly slice the cucumber with a mandoline or sharp knife. Trim crusts off the bread slices and cut each into quarters for bite-sized pieces.
- Assemble the Sandwiches: Spread the cream mixture evenly over the bread pieces. Place a cucumber slice on each prepared piece. Top with another bread slice if making double-layer bites.
- Decorate: Garnish with a sprinkle of dill or a small edible flower on top. Secure with a toothpick if needed.
Why They’re Amazing:
- Fresh and Light: Cucumber and herbs make these bites refreshing.
- Balanced Flavors: The creamy filling with lemon and herbs hits all the right notes.
- Elegant Presentation: They look fancy but are easy to make.
Serve these cucumber sandwich bites at your next gathering and watch them disappear in no time!
Mini Quiche Assortment

Mini quiches are little bites of joy, perfect for any gathering. These delightful treats come in various flavors, showcasing a beautiful array of colors and textures. Each quiche is nestled in a golden, flaky crust that adds just the right amount of crunch.
The assortment features a mix of fillings, from cheesy spinach to savory bacon. You can spot vibrant herbs sprinkled on top, enhancing the visual appeal and flavor. The variety makes it easy for everyone to find their favorite.
These mini quiches are not only tasty but also easy to serve. They can be enjoyed hot or at room temperature, making them ideal for parties, brunches, or even a cozy night in. With their charming presentation and delicious taste, they are sure to impress your guests.
Ingredients Breakdown
Let’s dive into what makes these mini quiches so irresistible. They’re light, flavorful, and each serving is under 250 calories—a perfect bite-sized delight.
For the Crust:
- 1 1/2 cups whole wheat flour (for a hearty, flaky base)
- 1/2 cup unsalted butter, chilled and cubed (for that perfect flakiness)
- 1/4 tsp salt (enhances flavor)
- 3-4 tbsp ice water (for bringing the dough together)
For the Egg Mixture:
- 4 large eggs (for structure and richness)
- 1 cup skim milk (keeps it light yet creamy)
- 1/2 tsp salt (balances the flavors)
- 1/4 tsp black pepper (for a hint of spice)
Suggested Fillings:
Cheesy Spinach:
- 1 cup fresh spinach, chopped (adds freshness and color)
- 1/2 cup shredded reduced-fat cheddar cheese (for melty goodness)
Savory Bacon:
- 4 slices turkey bacon, cooked and crumbled (for a smoky bite)
- 1/4 cup diced onion (adds a savory kick)
Tomato & Basil:
- 1/2 cup cherry tomatoes, halved (juicy bursts of flavor)
- 1/4 cup fresh basil, chopped (for an herby twist)
How to Make Them:
- Prepare the Crust: In a bowl, combine flour and salt. Cut in butter until the mixture resembles coarse crumbs. Slowly add ice water until a dough forms. Chill for 30 minutes.
- Roll and Cut: Roll out the dough on a floured surface. Cut into circles that fit your mini muffin tin or tart molds. Press gently into the molds.
- Pre-Bake the Crusts: Preheat oven to 375°F (190°C). Bake the crusts for 8-10 minutes or until lightly golden.
- Mix the Egg Base: Whisk together eggs, milk, salt, and pepper in a bowl until smooth.
- Assemble the Quiches: Fill each crust with your desired fillings. Pour the egg mixture over the fillings, leaving a bit of space at the top.
- Bake to Perfection: Bake for 20-25 minutes or until the quiches are set and golden on top. Let them cool slightly before serving.
Why They’re Amazing:
- Customizable: You can mix and match fillings based on your preferences.
- Make-Ahead Friendly: They can be prepared in advance and reheated easily.
- Wholesome and Delicious: Light yet flavorful with a perfectly flaky crust.
These mini quiches aren’t just appetizers—they’re conversation starters. Their delicious fillings and charming presentation will make your next gathering unforgettable!
Fruit Kabobs with Yogurt Dip
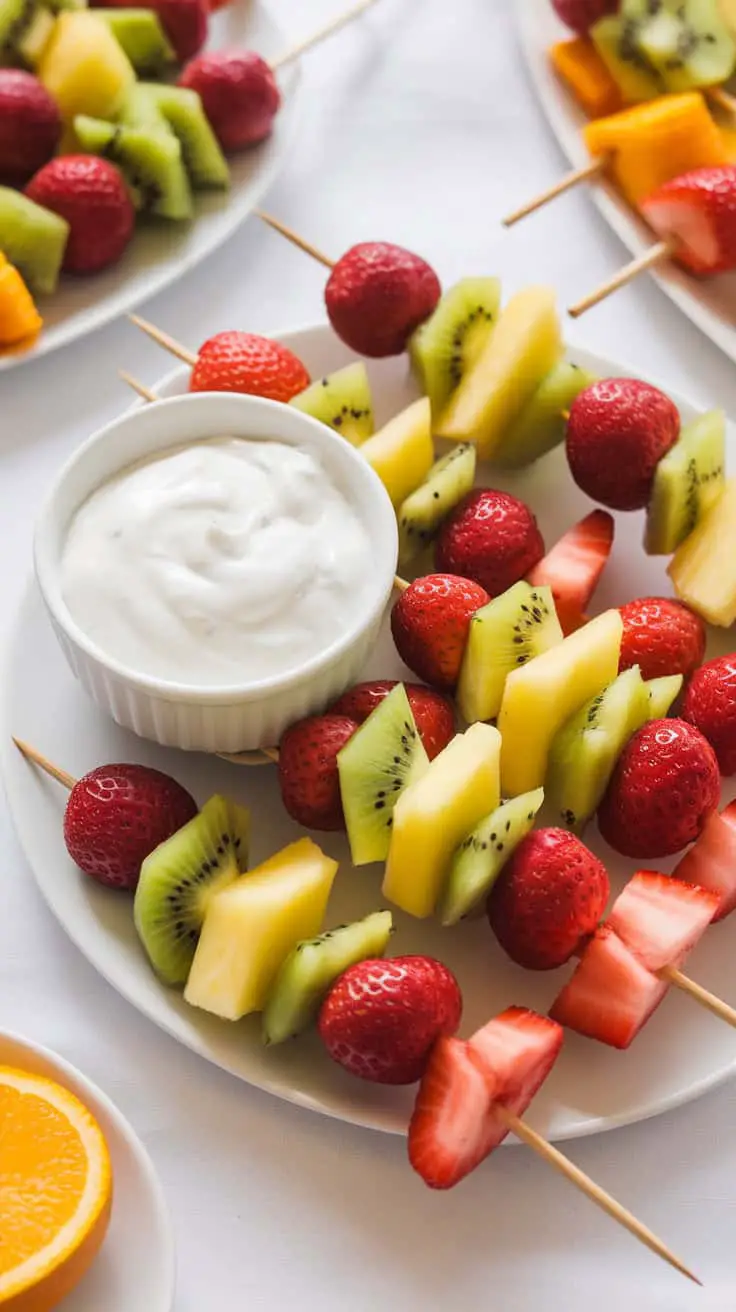
Fruit kabobs are a fun and colorful way to enjoy a variety of fresh fruits. The image showcases vibrant skewers filled with juicy strawberries, sweet pineapple, and refreshing kiwi. These kabobs are not only eye-catching but also packed with flavor and nutrients.
Next to the kabobs, a bowl of creamy yogurt dip adds an extra touch. This dip complements the fruits perfectly, providing a smooth and tangy contrast to the sweetness of the fruit. It’s a great option for a snack or dessert and is easy to make.
To prepare these delightful kabobs, simply chop your favorite fruits into bite-sized pieces and thread them onto skewers. You can mix and match fruits based on your preferences. For the yogurt dip, just mix plain yogurt with a bit of honey or vanilla extract for sweetness. This dish is sure to please everyone!
Ingredients Breakdown
Let’s build these refreshing fruit kabobs with a creamy yogurt dip that’s as delicious as it is healthy. Each serving is under 250 calories, making it a perfect guilt-free treat.
For the Fruit Kabobs:
- 1 cup strawberries (hulled and halved, sweet and juicy)
- 1 cup pineapple chunks (fresh or canned in juice, not syrup)
- 1 cup kiwi slices (peeled and sliced into thick rounds)
- 1 cup grapes (red or green, seedless)
- 1 cup blueberries (for a pop of color and antioxidants)
- Wooden or reusable skewers (for assembling the kabobs)
For the Yogurt Dip:
- 1 cup plain Greek yogurt (creamy and protein-packed)
- 2 tbsp honey (for natural sweetness)
- 1 tsp vanilla extract (for added flavor)
- A sprinkle of cinnamon (optional, for warmth and depth)
How to Make It:
- Prepare the Fruits: Wash and dry all fruits thoroughly. Hull the strawberries, slice the kiwi, and cut the pineapple into bite-sized chunks.
- Assemble the Kabobs: Thread the fruits onto the skewers in a fun, alternating pattern. Mix up the colors for a visually appealing look.
- Make the Dip: In a medium bowl, whisk together the Greek yogurt, honey, vanilla extract, and cinnamon (if using) until smooth.
- Serve and Enjoy: Arrange the fruit kabobs on a platter with the yogurt dip in a bowl at the center. Serve immediately or refrigerate until ready to enjoy.
Why It’s Amazing:
- Naturally Sweet: The fruits bring a burst of natural sweetness.
- Wholesome and Healthy: Packed with vitamins, fiber, and protein.
- Simple and Fun: Easy to assemble and perfect for any occasion.
This dish is a beautiful, nutritious snack that’s perfect for parties, picnics, or anytime you want a healthy treat!
Cheese and Charcuterie Mini Cones

These cheese and charcuterie mini cones are a fun twist on traditional snack boards. Each cone is filled with a delightful mix of meats and cheeses, making them a perfect bite-sized treat. You can see a variety of ingredients peeking out, including slices of salami, cubes of cheddar, and olives.
The presentation is charming, with the cones arranged neatly on a wooden platter. A cute banner reading ‘It’s a party!’ adds a festive touch, making these cones ideal for gatherings or casual get-togethers. The mix of colors from the different cheeses and meats brings life to the display.
Whether you’re hosting a party or just enjoying a snack, these mini cones are sure to impress. They are easy to make and even easier to enjoy. Plus, they offer a great way to share different flavors without the need for plates or utensils!
Ingredients Breakdown
Let’s dive into what makes these cheese and charcuterie mini cones a hit at any gathering. They’re easy to assemble, visually stunning, and loaded with mouthwatering flavors.
For the Mini Cones:
- 12 mini waffle cones (crunchy and sturdy for holding fillings)
Cheeses:
- 1 cup sharp cheddar cubes (bold and flavorful)
- 1 cup gouda slices, rolled (smooth and creamy)
- 1/2 cup mozzarella balls (mild and soft for variety)
Charcuterie Meats:
- 12 slices salami (spicy and savory)
- 12 slices prosciutto (silky and salty)
- 1/2 cup peppered turkey slices (for a milder option)
Extras & Garnishes:
- 1/2 cup assorted olives (green and black for briny contrast)
- 1/2 cup dried apricots (for a hint of sweetness)
- 1/2 cup mixed nuts (crunch and texture)
- Fresh rosemary sprigs (for a festive look)
How to Assemble:
- Prep the Ingredients: Cut the cheeses into bite-sized pieces and roll the meats for easy assembly.
- Fill the Cones: Start by adding a few cubes of cheddar or gouda at the bottom of each cone. Layer in meats like salami or prosciutto, folding them neatly for a polished appearance.
- Add Variety: Tuck in olives, dried apricots, and mozzarella balls around the meats and cheeses. Alternate colors and textures for an appealing presentation.
- Finish with Garnishes: Top each cone with mixed nuts and a sprig of rosemary for freshness and a pop of green.
- Display: Arrange the filled cones upright on a wooden platter or serving tray. Add a festive banner or decorative sign to enhance the party vibe.
Why They’re a Party Favorite:
- Bite-Sized Convenience: No utensils needed—just grab and enjoy!
- Flavor-Packed: A mix of savory, sweet, creamy, and crunchy in every bite.
- Visually Stunning: The cones’ vibrant colors and elegant arrangement make a lasting impression.
These cheese and charcuterie mini cones are more than snacks—they’re show-stopping conversation starters. Perfect for parties, holidays, or even an upscale picnic, they’re guaranteed to delight your guests with every flavorful bite!
Tiny Taco Cups

Tiny taco cups bring a fun twist to any gathering. These little delights are not only adorable but also packed with flavor. Imagine crisp taco shells shaped like cups, ready to hold a delicious filling of seasoned meat, fresh veggies, and tasty toppings.
The bright colors in the image show off a festive setup, perfect for a celebration. You can see vibrant ingredients like chopped tomatoes, shredded cheese, and crispy lettuce, all waiting to be piled high in those cups. It’s a visual treat that makes anyone hungry!
Whether you’re hosting a baby shower, birthday party, or a casual get-together, tiny taco cups are sure to impress. They’re easy to pick up and enjoy, making them a hit for all ages. Plus, you can customize each cup with different fillings, so everyone gets something they love.
Ingredients Breakdown
Let’s dive into what makes these tiny taco cups such a hit. They’re simple to assemble, loaded with flavor, and perfectly portioned to keep things under 250 calories per serving.
For the Taco Cups:
- 12 mini flour tortillas (soft and easy to shape)
- Cooking spray (to keep them crispy)
For the Filling:
- 1/2 lb lean ground beef or ground turkey (protein-packed)
- 1 small onion, finely chopped (for a flavor boost)
- 1 packet taco seasoning mix (or homemade seasoning)
- 1/2 cup canned black beans, rinsed and drained (for extra fiber)
- 1/2 cup corn kernels (sweet and juicy)
- 1 cup diced tomatoes (fresh and juicy)
- 1/2 cup shredded lettuce (crunchy and refreshing)
For Toppings:
- 1/2 cup reduced-fat shredded cheddar cheese (melty goodness)
- 1/4 cup low-fat sour cream (for a tangy finish)
- 1/4 cup chopped fresh cilantro (optional but flavorful)
- Lime wedges (for an extra zing)
How to Make It:
- Preheat & Prep: Preheat the oven to 375°F (190°C). Spray a muffin tin with cooking spray.
- Shape the Tortillas: Gently press each mini tortilla into a muffin cup, forming a cup shape. Spray lightly with cooking spray.
- Bake the Cups: Bake for 8-10 minutes or until crispy and golden. Remove and let cool.
- Cook the Filling: In a skillet over medium heat, cook the ground beef or turkey until browned. Add the chopped onion and cook until softened. Stir in taco seasoning, black beans, and corn. Simmer for 5 minutes.
- Assemble the Cups: Spoon the filling evenly into each taco cup.
- Add Toppings: Sprinkle with cheese, lettuce, tomatoes, and a dollop of sour cream. Garnish with cilantro if using.
- Serve and Enjoy: Squeeze a bit of lime juice over the top before serving for extra flavor.
Why They’re a Hit:
- Perfect Party Bites: Easy to grab, no utensils needed.
- Customizable: Switch up the fillings with your favorite ingredients.
- Healthy & Tasty: Balanced flavors and under 250 calories per serving.
These tiny taco cups are guaranteed to be the star of your next gathering. Their crispy shells, savory filling, and fresh toppings make every bite unforgettable!
Sweet Potato Rounds with Avocado and Bacon
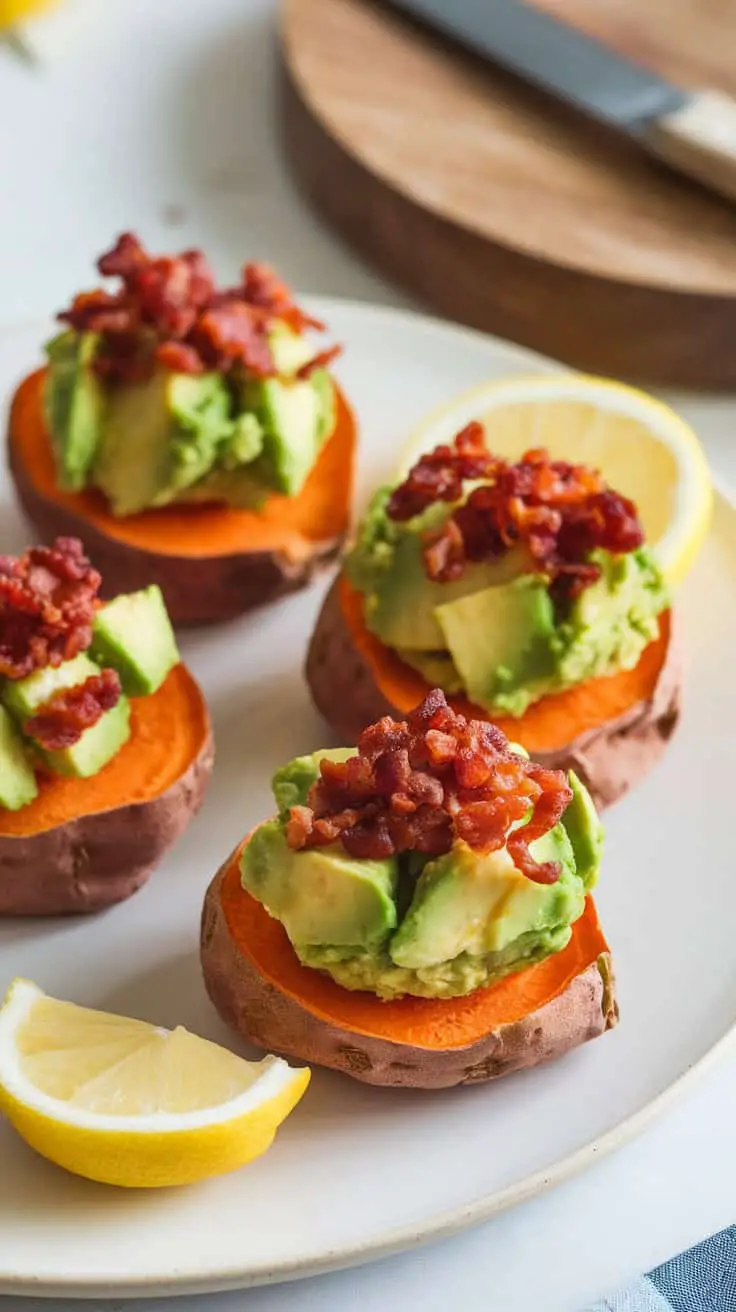
These sweet potato rounds topped with avocado and crispy bacon make for an eye-catching and delicious snack or appetizer. The bright orange of the sweet potato contrasts beautifully with the creamy green avocado and the rich red of the bacon. Each bite is a tasty combination of flavors and textures that everyone will love.
To make these, start by slicing sweet potatoes into thick rounds. Roast them until they’re tender, then add a generous scoop of mashed avocado on top. Crispy bacon bits sprinkled over the avocado add a savory crunch. A squeeze of lemon over everything brightens up the dish and enhances the flavors.
This simple recipe is perfect for gatherings or a cozy night in. It’s satisfying, healthy, and oh-so-delicious. Plus, it’s a fun way to enjoy sweet potatoes in a new way!
Ingredients Breakdown
Let’s get into what makes these sweet potato rounds so irresistible. Each ingredient adds its own magic, and the best part is that it’s all under 250 calories per serving.
For the Sweet Potato Rounds:
- 2 medium sweet potatoes (rich in fiber and naturally sweet)
- 1 tbsp olive oil (for roasting and crisping)
- 1/2 tsp salt (to enhance the flavor)
- 1/4 tsp black pepper (for a subtle kick)
For the Toppings:
- 2 ripe avocados (creamy and nutrient-packed)
- 1 tbsp lemon juice (to keep the avocado fresh and add brightness)
- 4 slices of turkey bacon or center-cut bacon (crispy and savory)
- Optional: red pepper flakes or smoked paprika (for added heat or smokiness)
For Garnish:
- Lemon slices (for extra freshness)
- Fresh herbs like cilantro or parsley (optional but pretty!)
How to Make It:
- Prepare the Sweet Potatoes: Preheat your oven to 425°F (220°C). Wash and slice the sweet potatoes into 1/2-inch thick rounds. Toss them in olive oil, salt, and pepper.
- Roast the Rounds: Arrange the sweet potato slices on a baking sheet in a single layer. Roast for 20-25 minutes, flipping halfway through, until golden brown and tender.
- Cook the Bacon: While the sweet potatoes are roasting, cook the bacon in a skillet over medium heat until crispy. Transfer to a paper towel-lined plate and crumble when cool.
- Make the Avocado Mash: In a small bowl, mash the avocados with lemon juice, salt, and pepper to taste. Keep it slightly chunky for texture.
- Assemble the Rounds: Once the sweet potato rounds are done, let them cool slightly. Top each round with a spoonful of avocado mash and sprinkle with crispy bacon bits.
- Garnish and Serve: Add a squeeze of lemon juice over the top for extra freshness. Garnish with herbs or a dash of red pepper flakes if desired.
Why It’s Amazing:
- Balanced Flavors: The sweetness of the potatoes, the creamy avocado, and the salty bacon create a perfect harmony.
- Nutrient-Packed: Sweet potatoes and avocados are loaded with vitamins, fiber, and healthy fats.
- Quick and Impressive: This recipe comes together fast but looks fancy enough for guests.
Serve these delicious rounds at your next gathering or enjoy them as a satisfying snack. They’re a hit every time!
Caprese Salad Stuffed Cherry Tomatoes
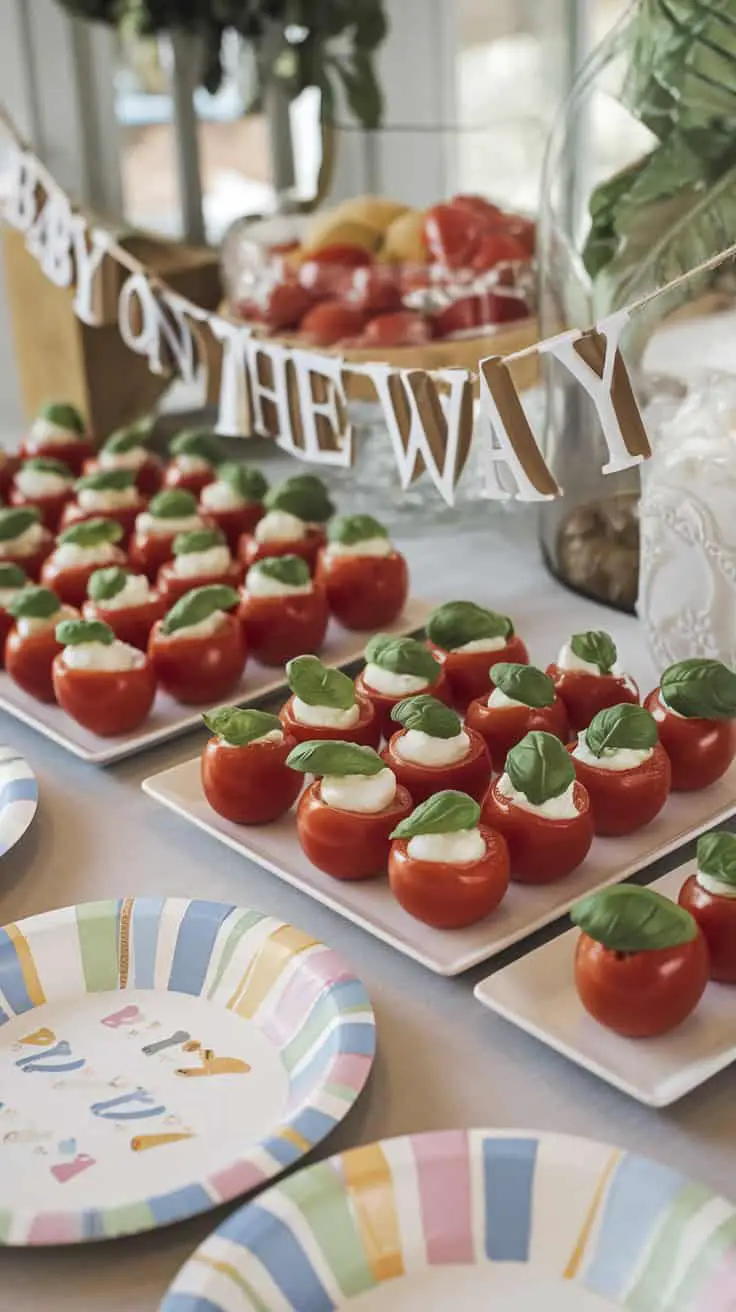
These cherry tomatoes are a delightful twist on the classic Caprese salad. Each tomato is hollowed out and filled with creamy goodness, topped with a fresh basil leaf. They’re not just tasty; they’re also visually appealing, making them perfect for any gathering.
To make these, you’ll need cherry tomatoes, fresh mozzarella, basil, and a splash of balsamic glaze. Start by slicing the tops off the tomatoes and carefully scooping out the insides. Fill them with diced mozzarella and a drizzle of olive oil, then garnish with basil.
These stuffed tomatoes are ideal for celebrations. Whether it’s a baby shower or a summer picnic, they bring a fresh touch to the table. Serve them on colorful plates for a fun presentation that guests will love!
Ingredients Breakdown
These Caprese Salad Stuffed Cherry Tomatoes are simple yet bursting with flavor. They’re fresh, light, and under 250 calories per serving—a perfect party snack.
For the Stuffed Tomatoes:
- 1 pint cherry tomatoes (the star of the show, sweet and juicy)
- 4 oz fresh mozzarella, diced (for creamy, cheesy goodness)
- 1/4 cup fresh basil leaves, small or torn (adds a burst of herbal freshness)
- 2 tbsp extra-virgin olive oil (for a silky finish)
- 1 tbsp balsamic glaze (for tangy sweetness)
- Salt and pepper to taste (enhances every bite)
How to Make It:
- Prepare the Tomatoes: Slice off the tops of the cherry tomatoes and carefully scoop out the insides using a small spoon or melon baller. Set them upside down on paper towels to drain.
- Make the Filling: In a bowl, mix diced mozzarella, olive oil, salt, and pepper. Toss gently to coat the cheese without breaking it.
- Stuff the Tomatoes: Turn the tomatoes upright and fill each with the mozzarella mixture. Add a small basil leaf on top of each for that signature Caprese look.
- Drizzle with Balsamic Glaze: Lightly drizzle balsamic glaze over the stuffed tomatoes just before serving.
Why They’re Amazing:
- Fresh and Flavorful: The combination of juicy tomatoes, creamy mozzarella, and fragrant basil is a match made in heaven.
- Light and Healthy: These are naturally low in calories and high in fresh ingredients.
- Perfect Presentation: The bright red tomatoes and green basil leaves create a stunning, party-ready appetizer.
These Caprese Salad Stuffed Cherry Tomatoes are more than a snack—they’re a fresh, delicious way to elevate any celebration. Simple to make and delightful to eat, they’re sure to impress your guests!
Pigs in a Blanket with Mustard Dip

Pigs in a blanket bring a fun twist to classic snacks. These little treats are perfect for parties or cozy gatherings. The image shows a vibrant platter filled with bite-sized sausages wrapped in dough, held together by colorful toothpicks. Each sausage is neatly wrapped, making them easy to grab and enjoy.
Accompanying the pigs in a blanket is a small bowl of mustard dip. This tangy dip adds a delightful kick, enhancing the overall flavor. The playful presentation, with bright colors and festive decorations, makes these snacks even more appealing.
If you’re planning to serve these at your next event, consider adding a few sides. Fresh veggies or a light salad can balance out the dish. These bites are not just tasty; they are also a crowd-pleaser. Everyone loves them!
Ingredients Breakdown
Let’s dive into what makes these pigs in a blanket so irresistible. They’re fun, flavorful, and just right for snacking.
For the Pigs in a Blanket:
- 12 mini chicken or turkey sausages (for a lighter twist)
- 1 can of refrigerated crescent roll dough (easy and flaky)
- 1 tbsp sesame seeds (optional, for added crunch and appeal)
- 1 large egg, beaten (for a golden finish)
For the Mustard Dip:
- 1/4 cup Dijon mustard (smooth and tangy)
- 2 tbsp honey (for a touch of sweetness)
- 1 tbsp apple cider vinegar (for depth of flavor)
- 1/2 tsp garlic powder (optional, for a savory kick)
- Salt and pepper, to taste
How to Make It:
- Preheat the Oven: Set your oven to 375°F (190°C) and line a baking sheet with parchment paper.
- Prepare the Dough: Unroll the crescent dough and cut it into 12 even strips.
- Wrap the Sausages: Roll each sausage in a strip of dough, starting from one end and leaving the tips of the sausages slightly exposed.
- Egg Wash and Topping: Place the wrapped sausages on the baking sheet, brush them with beaten egg, and sprinkle sesame seeds on top if using.
- Bake: Bake for 12-15 minutes or until golden brown and puffy.
- Make the Dip: While the pigs in a blanket bake, whisk together Dijon mustard, honey, apple cider vinegar, garlic powder, salt, and pepper in a small bowl.
- Serve: Arrange the pigs in a blanket on a platter with the mustard dip in the center. Add colorful toothpicks for easy grabbing!
Why They’re a Hit:
- Quick and Easy: Ready in under 30 minutes.
- Flavor-Packed: The savory sausages and sweet-tangy mustard dip create the perfect balance.
- Party-Ready: Bite-sized and easy to serve, making them a party favorite.
These pigs in a blanket are not just snacks; they’re little bites of joy that disappear fast. Whip them up for your next gathering and watch them vanish in no time!
Bruschetta with Tomato and Basil
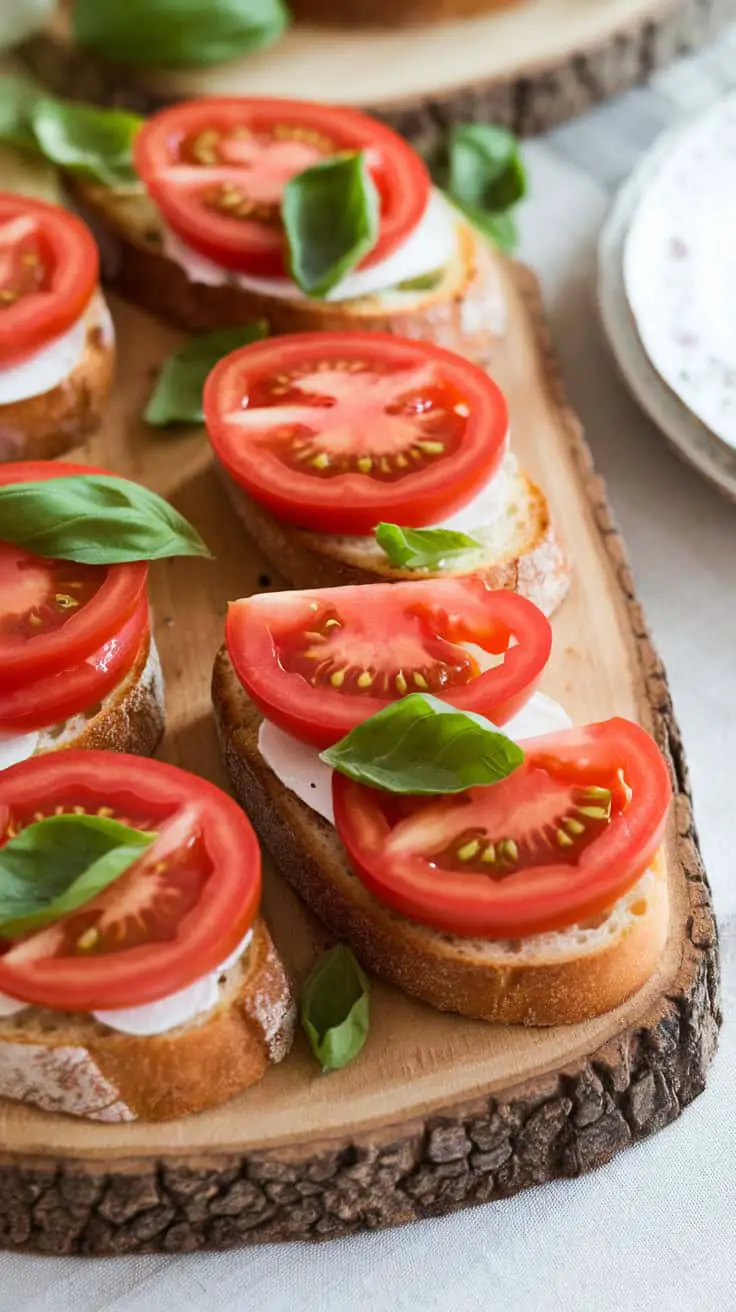
Bruschetta is a classic Italian appetizer that’s both simple and delicious. This version features fresh tomatoes stacked on toasted bread, making it a perfect starter or snack.
The image shows beautifully arranged slices of bread topped with juicy, red tomatoes and vibrant green basil leaves. The colors pop, inviting you to take a bite. Each ingredient plays its part, with the crunch of the bread complementing the softness of the tomatoes.
To make this tasty treat, you’ll need a few basic ingredients: fresh tomatoes, basil, mozzarella, and rustic bread. Start by toasting the bread until it’s golden brown. Then, layer slices of mozzarella, followed by fresh tomato slices and a sprinkle of basil. A drizzle of olive oil can add an extra touch of flavor.
This bruschetta not only looks great on a platter but also tastes amazing. It’s a great way to enjoy the freshness of summer ingredients, perfect for gatherings or a light meal.
Ingredients Breakdown
Let’s dive into making this mouthwatering Italian classic. With fresh, simple ingredients, you’ll have a flavorful dish ready in no time.
For the Bruschetta:
- 4-6 slices of rustic bread (like ciabatta or baguette, for a perfect crunch)
- 2 cups cherry tomatoes, diced (bursting with juicy sweetness)
- 1/4 cup fresh basil leaves, chopped (adds a fresh, herbal kick)
- 1 clove garlic, halved (for rubbing the bread)
- 2 tbsp extra virgin olive oil (for drizzling and enhancing flavor)
- 1 tbsp balsamic glaze (optional, for a hint of tangy sweetness)
- Salt and pepper to taste (brings out the flavors)
How to Make It:
- Toast the Bread: Preheat the oven to 400°F (200°C). Arrange the bread slices on a baking sheet. Brush lightly with olive oil on both sides. Toast for 5-7 minutes until golden and crisp.
- Prepare the Topping: While the bread is toasting, combine diced tomatoes, chopped basil, olive oil, salt, and pepper in a bowl. Let the flavors meld for about 10 minutes.
- Rub with Garlic: Once the bread is out of the oven, rub the cut side of the garlic clove on each slice. This subtle garlic flavor elevates the whole dish.
- Assemble the Bruschetta: Spoon the tomato-basil mixture generously onto each bread slice. If using, drizzle balsamic glaze over the top for extra depth.
Why It’s Amazing:
- Fresh and Light: Juicy tomatoes and fragrant basil make every bite taste like summer.
- Crunchy and Savory: Crisp bread contrasts beautifully with the soft topping.
- Quick and Elegant: Ready in minutes, perfect for parties or casual snacking.
Enjoy this classic bruschetta as a delightful appetizer, snack, or light meal that’s sure to impress!
Popcorn Chicken Bites with Honey Mustard

Popcorn chicken bites are a fun and tasty snack that can brighten any gathering. These little morsels are crispy on the outside and juicy on the inside, making them a hit with both kids and adults.
The image showcases a delightful spread of treats, with the popcorn chicken front and center. They’re presented in charming cups, adding a playful touch to the display. This colorful setup invites everyone to dig in and enjoy.
Pairing these bites with honey mustard sauce elevates the experience. The sweet and tangy flavor perfectly complements the savory chicken, creating a mouthwatering combination. Whether you’re hosting a party or just having a casual get-together, these bites and their sauce are sure to please the crowd.
Ingredients Breakdown
Let’s dive into what makes these crispy and juicy popcorn chicken bites so irresistible. They’re fun, flavorful, and easy to make—perfect for snacking or party platters.
For the Chicken Bites:
- 1 lb boneless, skinless chicken breasts (cut into bite-sized pieces)
- 1 cup buttermilk (for tender, juicy chicken)
- 1 cup all-purpose flour (for that perfect crispy coating)
- 1 cup panko breadcrumbs (for extra crunch)
- 1 tsp garlic powder (for savory depth)
- 1 tsp onion powder (for extra flavor)
- 1 tsp paprika (for a smoky hint)
- 1/2 tsp cayenne pepper (optional, for some heat)
- 1 tsp salt (to enhance flavor)
- 1/2 tsp black pepper (for seasoning)
- Cooking spray or oil (for frying or baking)
For the Honey Mustard Sauce:
- 1/4 cup Dijon mustard (for tanginess)
- 2 tbsp honey (for sweetness)
- 2 tbsp mayonnaise (for creaminess)
- 1 tbsp lemon juice (for brightness)
- 1/2 tsp smoked paprika (optional, for extra depth)
How to Make It:
- Marinate the Chicken: Toss the chicken pieces in buttermilk, cover, and refrigerate for at least 30 minutes to tenderize.
- Prepare the Coating: In a large bowl, mix flour, panko breadcrumbs, garlic powder, onion powder, paprika, cayenne pepper (if using), salt, and black pepper.
- Coat the Chicken: Remove chicken from the buttermilk, shaking off excess. Dredge each piece in the flour mixture, pressing gently to ensure even coating.
- Cook the Chicken:
- Frying: Heat oil in a deep skillet over medium heat. Fry the chicken in batches until golden brown and cooked through, about 4-5 minutes per batch. Drain on paper towels.
- Baking (Healthier Option): Preheat oven to 400°F (200°C). Place coated chicken on a greased baking sheet. Spray with cooking oil and bake for 20-25 minutes, flipping halfway through.
- Make the Sauce: In a small bowl, whisk together Dijon mustard, honey, mayonnaise, lemon juice, and smoked paprika until smooth.
- Serve and Enjoy: Arrange the chicken bites in fun cups or bowls. Serve with honey mustard sauce on the side for dipping.
Why They’re Amazing:
- Crispy and Juicy: The perfect balance of crunch and tenderness.
- Bold Flavor: The seasoning mix delivers a savory kick.
- Sweet and Tangy Sauce: Honey mustard brings it all together.
These popcorn chicken bites are not just a snack—they’re a celebration on a plate!
Spinach and Artichoke Phyllo Cups

These spinach and artichoke phyllo cups are a delightful addition to any gathering. The image showcases a beautifully arranged platter filled with golden-brown phyllo cups, each brimming with a savory filling. The combination of spinach and artichokes creates a rich flavor that pairs perfectly with the flaky texture of the phyllo.
Surrounding the platter, you can see a charming party setup with pastel-colored balloons and lovely floral arrangements, adding a festive touch. This setting highlights how these phyllo cups can elevate any occasion, whether it’s a casual get-together or a more formal celebration.
To make these tasty bites, you only need a few ingredients: fresh spinach, artichoke hearts, cream cheese, and phyllo dough. Simply mix the filling, spoon it into the cups, and bake until golden. They are easy to prepare and sure to impress your guests!
Ingredients Breakdown
Let’s talk about what makes these spinach and artichoke phyllo cups so irresistible. They’re crispy, creamy, and under 250 calories per serving—perfect for guilt-free snacking.
For the Filling:
- 1 cup fresh spinach, finely chopped (for a fresh, earthy taste)
- 1/2 cup canned artichoke hearts, chopped (for a tangy, rich flavor)
- 4 oz reduced-fat cream cheese, softened (for creaminess)
- 1/4 cup Greek yogurt (adds protein and tang)
- 1/4 cup grated Parmesan cheese (for a savory depth)
- 1 garlic clove, minced (for a hint of spice)
- 1/2 tsp onion powder (for a subtle flavor boost)
- Salt and pepper to taste (balances the flavors)
For the Phyllo Cups:
- 20 pre-made phyllo shells (available in the freezer aisle)
- Olive oil spray (for added crispiness)
How to Make It:
- Preheat the Oven: Set your oven to 375°F (190°C) to ensure even baking.
- Make the Filling: In a large mixing bowl, combine the spinach, artichokes, cream cheese, Greek yogurt, Parmesan, garlic, onion powder, salt, and pepper. Mix until smooth and well combined.
- Fill the Phyllo Cups: Arrange the phyllo shells on a baking sheet. Use a spoon or small cookie scoop to fill each shell with the spinach-artichoke mixture.
- Bake Until Golden: Lightly spray the filled cups with olive oil for extra crispness. Bake for 15-18 minutes or until the filling is bubbly and the edges of the phyllo are golden brown.
- Serve and Enjoy: Remove from the oven and let cool slightly before serving. These cups taste best warm but are delicious at room temperature too.
Why They’re Amazing:
- Crispy & Creamy: The contrast of flaky phyllo and creamy filling is unbeatable.
- Savory & Tangy: Artichokes and Parmesan cheese bring rich, tangy notes.
- Quick & Easy: They’re simple to assemble yet look impressively fancy.
These spinach and artichoke phyllo cups are the perfect appetizer for parties, gatherings, or even a cozy night in. They’re flavorful, elegant, and guaranteed to be a hit with your guests!
Mini Loaded Baked Potatoes

These mini loaded baked potatoes are a delightful treat you can easily whip up for any gathering or snack time. Each potato is perfectly baked, then generously filled with a creamy mixture and topped with fresh ingredients.
In the image, you can see a wooden bowl brimming with these tasty bites. They are topped with a dollop of sour cream, shredded carrots, and sprinkled with chives for that extra pop of flavor. The presentation is inviting and makes them perfect for sharing.
To make them, start with small potatoes. Bake them until soft, scoop out some of the insides, and mix it with sour cream, cheese, and your choice of seasonings. Refill the skins and top with your favorite garnishes. Easy, right?
Ingredients Breakdown
Let’s dive into what makes these mini loaded baked potatoes so irresistibly good. Each ingredient plays a role in creating a perfectly balanced bite that’s creamy, savory, and fresh.
For the Potatoes:
- 12 small baby potatoes (gold or red for best results)
- 1 tbsp olive oil (to help with roasting)
- 1/2 tsp salt (for seasoning)
- 1/4 tsp black pepper (for a hint of spice)
For the Filling:
- 1/2 cup sour cream (creamy and tangy)
- 1/3 cup shredded cheddar cheese (melty goodness)
- 2 tbsp unsalted butter (for richness)
- 1/4 tsp garlic powder (adds depth of flavor)
- 2 tbsp cooked bacon bits (optional but highly recommended)
For the Toppings:
- 1/4 cup shredded carrots (adds a touch of sweetness and color)
- 2 tbsp chopped chives (fresh and oniony)
- Extra sour cream (for garnish)
- Additional bacon bits (if desired)
How to Make It:
- Prepare the Potatoes: Preheat the oven to 400°F (200°C). Wash and dry the baby potatoes. Toss them in olive oil, salt, and pepper. Place on a baking sheet and roast for 25-30 minutes until fork-tender.
- Scoop and Mix: Once the potatoes have cooled slightly, cut a small slit on top and gently scoop out a bit of the insides using a small spoon. Be careful not to tear the skins.
- Make the Filling: In a bowl, mash the scooped-out potato with sour cream, shredded cheese, butter, garlic powder, and bacon bits. Mix until smooth and well combined.
- Stuff the Potatoes: Spoon the creamy filling back into each potato. Pile it high!
- Bake Again: Return the filled potatoes to the oven for 10-12 minutes until heated through and the cheese is bubbly.
- Add Toppings: Top each potato with a dollop of sour cream, shredded carrots, chopped chives, and extra bacon bits if desired.
Why They’re Amazing:
- Crispy Skins & Creamy Filling: The crispy roasted potato skins contrast beautifully with the creamy, cheesy filling.
- Customizable: Add or swap toppings to match your taste.
- Bite-Sized Perfection: They’re perfect for parties, snacks, or even a light meal.
These mini loaded baked potatoes are comfort food done right—crispy, creamy, savory, and absolutely delicious!
Mini Grilled Cheese and Tomato Soup Shots

Mini grilled cheese sandwiches paired with tomato soup shots make for a delightful and whimsical snack. These little bites bring comfort food to a whole new level, perfect for gatherings or kids’ parties.
The sandwiches are cut into small squares, showcasing their gooey cheese filling. They are served alongside tiny glasses of rich, red tomato soup, creating a fun and interactive dining experience. Each bite of the crispy bread pairs wonderfully with the smooth soup, making it easy to enjoy.
The presentation is charming with pink accents, from the cute flags in the sandwiches to the pink tableware. This setup not only looks inviting but also sets a cheerful mood for any event.
To recreate this tasty treat, you’ll need simple ingredients like bread, cheese, and tomato soup. Just grill the sandwiches until golden brown, cut them into bite-sized pieces, and serve them with cups of warm soup for dipping. It’s an easy way to impress guests with a classic comfort dish!
Ingredients Breakdown
Let’s dive into the essentials for making these adorable mini grilled cheese and tomato soup shots. They’re fun, tasty, and under 250 calories per serving—perfect for snack time or party treats!
For the Mini Grilled Cheese:
- 8 slices of whole-grain bread (for extra fiber and crunch)
- 4 oz reduced-fat cheddar cheese (sharp and melty)
- 2 tbsp unsalted butter or cooking spray (for grilling)
For the Tomato Soup:
- 2 cups canned diced tomatoes (rich tomato base)
- 1 cup low-sodium vegetable broth (balances the flavor)
- 1/2 cup unsweetened almond milk (adds creaminess without extra calories)
- 1 small onion, finely chopped (for added depth)
- 1 garlic clove, minced (for savory richness)
- 1 tsp olive oil (for sautéing)
- 1 tsp dried basil (for herby goodness)
- 1/2 tsp salt (adjust to taste)
- 1/4 tsp black pepper (for a bit of heat)
For Garnish and Serving:
- Fresh basil leaves (optional, for garnish)
- Mini skewers or decorative flags (for serving)
How to Make It:
- Make the Tomato Soup:
- Heat olive oil in a saucepan over medium heat. Sauté the onions and garlic until softened and fragrant.
- Add diced tomatoes, vegetable broth, almond milk, basil, salt, and pepper. Bring to a boil, then reduce heat and simmer for 20 minutes.
- Use an immersion blender or regular blender to puree until smooth. Keep warm.
- Prepare the Grilled Cheese:
- Butter one side of each bread slice or spray with cooking spray. Place cheese between two slices, buttered sides facing out.
- Heat a skillet over medium heat. Grill sandwiches until golden brown on both sides and the cheese is melted.
- Let them cool slightly, then cut into small squares.
- Assemble and Serve:
- Pour warm tomato soup into shot glasses or small cups.
- Skewer mini grilled cheese squares onto decorative picks.
- Serve the sandwiches alongside the soup shots for dipping.
Why You’ll Love It:
- Comfort Meets Fun: Classic comfort food made party-ready.
- Wholesome Ingredients: Whole-grain bread, reduced-fat cheese, and low-sodium soup keep it light yet satisfying.
- Interactive and Delightful: The dipping fun turns this into an entertaining snack for all ages.
This tasty pairing is more than just a snack—it’s a crowd-pleaser that’s both nostalgic and modern. Enjoy the perfect bite of crispy, cheesy goodness dipped in velvety tomato soup at your next gathering!
Prosciutto-Wrapped Melon Bites
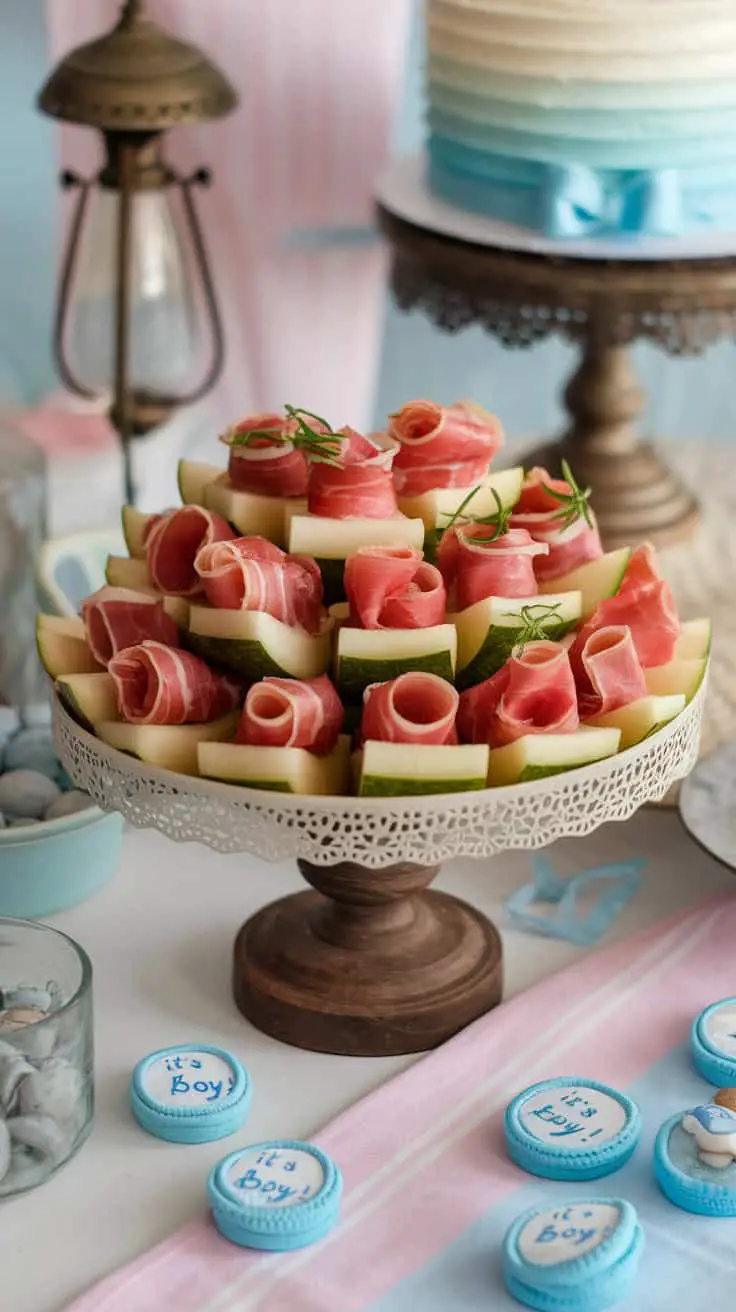
Prosciutto-wrapped melon bites are a delightful treat that combines sweet and savory flavors. This dish is visually appealing and perfect for gatherings or celebrations. In the image, you can see a beautifully arranged platter featuring juicy melon slices wrapped in thin, savory prosciutto. Each bite promises a burst of flavor.
The fresh melon adds a crisp texture, while the prosciutto offers a rich, salty contrast. This combination not only tastes great but also looks stunning on any table. Garnished with fresh herbs, these bites become an eye-catching centerpiece for any occasion.
Making these bites is simple. Just slice your favorite melon, wrap each piece in prosciutto, and secure it with a toothpick if needed. You can even add a sprig of rosemary or mint for extra flavor. Serve them chilled for the best experience. Enjoy these bites as a light appetizer or a refreshing snack!
Ingredients Breakdown
These prosciutto-wrapped melon bites are not just easy to make—they’re also light, refreshing, and full of contrasting flavors that pop in every bite. Here’s what you’ll need:
For the Bites:
- 1 medium cantaloupe or honeydew melon (sweet and juicy base)
- 8-10 slices of prosciutto (thinly sliced for easy wrapping)
- Fresh mint or basil leaves (optional, for a fresh herbal twist)
For the Garnish:
- Fresh rosemary sprigs (optional, for a rustic touch)
- Cracked black pepper (for a hint of spice)
- Drizzle of balsamic glaze (optional, for sweetness and depth)
How to Make It:
- Prepare the Melon: Slice the melon in half, remove the seeds, and cut it into bite-sized wedges or cubes. Aim for even sizes so they look neat and are easy to eat.
- Wrap the Melon: Take a slice of prosciutto and wrap it around each melon piece. The prosciutto should overlap slightly but not completely cover the melon—let that vibrant color shine through!
- Add Fresh Herbs: Tuck a fresh mint or basil leaf between the melon and prosciutto for a burst of herbaceous flavor.
- Assemble the Platter: Arrange the wrapped melon bites on a serving tray. For extra flair, sprinkle with cracked black pepper and lay a few rosemary sprigs across the platter.
- Optional Drizzle: If you like a touch of sweetness, drizzle balsamic glaze lightly over the bites just before serving.
Why It’s Amazing:
- Sweet Meets Savory: The juicy melon balances the salty prosciutto for a perfect bite.
- Fresh and Light: These bites are refreshing, making them ideal for warm-weather gatherings.
- Visually Stunning: The bright melon and elegant prosciutto create a show-stopping appetizer.
These prosciutto-wrapped melon bites are a must-have for any party or special occasion. They’re quick to make, full of bold flavors, and guaranteed to impress your guests!
Baby Mozzarella and Olive Skewers

These Baby Mozzarella and Olive Skewers are the perfect bite-sized treats for any gathering. The colorful arrangement showcases a delightful mix of ingredients that are not only tasty but also visually appealing. Each skewer features a blend of fresh mozzarella balls, vibrant olives, and cherry tomatoes, all held together by cheerful sticks.
The presentation is eye-catching, making them a great centerpiece for parties or picnics. Each skewer offers a burst of flavor, with the creamy mozzarella complementing the briny olives perfectly. It’s a simple recipe that impresses guests without requiring much effort.
To prepare these skewers, gather your ingredients: baby mozzarella balls, green and black olives, cherry tomatoes, and some decorative skewers. Thread the mozzarella, olives, and tomatoes onto the skewers, alternating for color and taste. Arrange them on a platter and watch everyone enjoy!
Ingredients Breakdown
Let’s dive into what makes these Baby Mozzarella and Olive Skewers so irresistible. They’re simple, fresh, and perfect for any occasion—all while staying under 250 calories per serving.
For the Skewers:
- 12 baby mozzarella balls (creamy and mild)
- 12 cherry tomatoes (sweet and juicy)
- 6 green olives, pitted (briny and flavorful)
- 6 black olives, pitted (rich and savory)
- Fresh basil leaves (optional, for added freshness)
- Decorative wooden skewers or cocktail sticks
For the Balsamic Drizzle (Optional):
- 2 tbsp balsamic glaze (adds a sweet-tart finish)
- 1 tbsp extra virgin olive oil (for a light shine)
- Pinch of sea salt and cracked black pepper (enhances all the flavors)
How to Make It:
- Prepare the Ingredients: Rinse the cherry tomatoes and pat them dry. Drain the mozzarella balls and olives.
- Assemble the Skewers:
- Take a decorative skewer and start with a cherry tomato.
- Follow with a baby mozzarella ball.
- Add a green olive, then a black olive.
- Finish with another mozzarella ball and a cherry tomato.
- Repeat with the remaining ingredients.
- Optional Touch: Drizzle the balsamic glaze and olive oil over the skewers. Sprinkle with sea salt and black pepper for extra zing.
- Arrange and Serve: Place the skewers on a festive platter. Add a few basil leaves for extra color and aroma.
Why They’re a Hit:
- Balanced Flavors: The creamy mozzarella and briny olives complement the sweet tomatoes.
- Visually Stunning: Alternating colors make for a beautiful presentation.
- Quick and Easy: Assembly is a breeze, making it a go-to party appetizer.
These Baby Mozzarella and Olive Skewers are proof that simple ingredients can create something extraordinary. They’re perfect for entertaining or enjoying as a light snack anytime!


